


With bunnies and little chicks 🐣, this is a great occasion to gather with loved ones and make a nice dinner. If you’re hosting, you’ll end up making a scrumptious dessert. It can be a Carrot Cake, Lemon Meyer Cake, Cheesecake, Lavender Cupcakes, Lemon Meringue Pie, Hummingbird Cake, and so on…
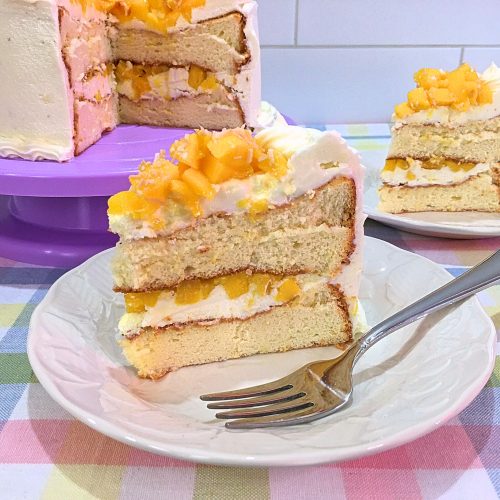
Another one that originated from the Philippines 🌏 and is incredibly delicious is Mango Cake! Made with a nice sponge cake along with a mango filling and wrapped up with a beautiful creamy Cream Cheese Frosting, this is the ideal dessert for Easter!
It’s not a complicated recipe but it takes time ⏰ particularly for the making of the cake. It’s technical, that’s all! To get that light, fluffy and airy texture, you have to follow each step and not rush anything. Just like chiffon and angel food cakes, sponge is delicate and needs some attention to details…
First, the flour has to be sifted and measured 📏. I like using self-rising flour because of the added leavening agent but many will use cake flour instead with its low protein content and milled into a superfine consistency.
However, when I add sifted self-rising flour to my egg yolk mixture, I sift it once again. Doing it twice adds more air to the flour which means the texture of the cake 🍰 will be lighter and fluffier. If using cake flour, you don’t have to sift it twice.
Before integrating the flour into the yolks, they have to be whisked properly. After adding granulated sugar and toasted coconut flakes 🥥, the yolk mixture has to become thick and fluffy, its color turning to a light yellow, and when lifting the whisk from the bowl, the batter falls back in a ribbon.
After they’re done, the sifted flour is added by batches through the sifter (no need if using cake flour), mixing well between each addition. By the time the flour is all in, the batter will get very thick therefore, add a little milk 🥛, just enough to finish mixing the batter properly. Don’t go beyond ½ tablespoon.
Now the egg whites…
The whites 🥚 as well as cream of tartar are added to the bowl of a stand mixer and processed until soft peaks form before adding the remaining sugar. Why adding cream of tartar? It stabilizes the whipped egg whites, keeping the air bubbles stable and also helps the cake to rise.
When the granulated sugar is all in, we continue whipping the egg white mixture until stiff peaks form before adding it, by batches, to the batter (egg yolk mixture). Take your time to fold 🥄 them in gently until nicely incorporated – don’t knock out the air bubbles!
We’re now ready to transfer the batter into cake pans BUT that too, is different from regular cakes. The bottoms of the cake pans are lined with parchment paper rounds that are lightly greased 🧈 while the sides are NOT! Why’s that?
The ungreased sides help the batter to rise and for the cake to get structure. If the sides are greased, then the batter will slide down and the cake will collapse. It needs to grip onto the sides in order to achieve the tall, fluffy cake 💭 we’re looking for!
When placing the parchment rounds, make sure to smooth them out to prevent the batter from getting under it. If you’re not familiar on how to make them, click on this link 💻 for a quick tutorial… Parchment Paper Rounds for Cakes
Carefully, transfer the cake pans onto a wire rack after being baked. Let them cool partially for 20 minutes ⏳ before inverting them onto the wire rack. The reason why we flip the cake pans is to maintain their height. By cooling them upside down, the gravity prevents the center from sinking. This also applies to chiffon and angel food cakes.
While they’re cooling, make the Cream Cheese Frosting. It’s exactly the same recipe except, for this Mango Cake application, pure coconut extract is used instead of vanilla extract. If using other cake flavors 🍊, you might want to switch for a different extract.
Next step is to assemble the cake…
If the cakes have to be leveled out, use a serrated knife 🔪. After spreading out about ½ cup of the frosting or enough to cover, half of the diced mangoes is spooned over in a single layer. The second cake is placed on top before entirely covering the cake with the frosting, keeping some to make the rosettes.
David is the expert when it comes to piping. The rosettes are piped all around the outside edge on top of the cake. He’s using a 1M but any other large star ⭐ piping tip will do. If you like, pipe some frosting around the cake at the bottom with the same tip… it makes a nice presentation.
The rest of the mangoes 🥭 are neatly spooned into the center, making sure to keep the rosettes intact. For the finishing touch, some toasted coconut flakes are sprinkled over the fruit and not on top of the rosettes. If you’re not to sure how to prep mango, click here… How to Cut a Mango
Easter 🐰 is bright, with gorgeous pastel colors. Although I make this dessert throughout the year, this Mango Cake fits perfectly for the occasion! Don’t let the steps stop you from making this scrumptious dessert… it’s so worth it!
Bon Appétit! 🍽
Check out these other scrumptious cake recipes… 😀
– Chocolate Beet Cake
– Tropical Pineapple Upside Down Cake
– Red Velvet Cake
– Cranberry Orange Bundt Cake
– Black Forest Cake
– Orange Flan
– Lamington Cake
– Blueberry Cake
– Coffee Cake
and for even more dessert recipes 🍰🍩, click on this link… Recipe Category • Dessert
For ingredient amounts, directions, and much more, visit ➡ https://clubfoody.com/cf-recipes/mango-cake/
Don’t forget to subscribe to our YouTube channel 📽 by clicking on this link… Club Foody YouTube
No comments:
Post a Comment