Thursday, February 24, 2022

Caribbean Jerk Chicken Pizza Recipe •Tastes of the Islands| Club Foody


Pizza! That finger food everyone enjoys! Besides the bragging rights, what’s fun about making it from scratch is you can play with the sauces and toppings to suit your personal tastes. Over the years, I’ve shared many homemade pizza recipes that I’ve created; from SombreroMeat LoversQuattro Formaggi to SeafoodHawaiianGreekPulled Pork and many more. Here’s another one to add to this yummy list… my Caribbean Jerk Chicken Pizza!
 
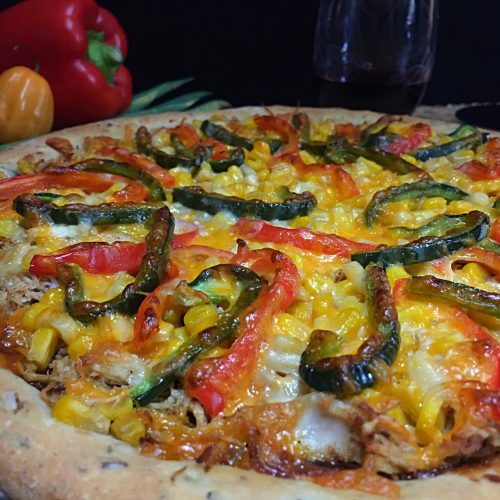
This pie is absolutely delicious! It’s vibrant and packed with flavors! It’s a little zippy but like most recipes, you can always dismiss the habañero pepper and adjust it to your liking. It’s easy to make and the results are incredible!
 
I use many other recipes to achieve this amazing Caribbean Jerk Chicken Pizza and this is the reason why I didn’t post it until now…
First, I use my kitchen trick when it comes to poaching and shredding the chicken. Then I add my Jamaican Jerk Seasoning… it’s a great spice blend to have in your cupboard. To assemble the pizza, I use my Green Onion Pizza Dough but as I mentioned in the video, it’s interchangeable with my other dough recipes; Easy-Cheesy or Rustic Italian. Another wonderful ingredient that goes on it is my Caribbean BBQ Sauce. That sauce is packed with beautiful flavor and gives just the right flare to this pie.
 
One ingredient that Caribbean cuisine doesn’t really care about is cheese but I DO! Any respectable pizza needs some cheese and I’m right on board with it – did I ever tell you what my nickname is… It’s Minnie Mouse, lol! I use both sharp white and yellow cheese because of the appearance of the pie but if you prefer, simply use one or the other… it won’t really matter in flavor.
 
This Caribbean Jerk Chicken Pizza has the tastes and colors of the islands! If you want an original recipe to enjoy on pizza night, this is certainly one to make.
Bon Appétit!
 
Here are several more comfort food recipes for you to enjoy…
– Baked Chicken Drumettes and Wings
– Onion Rings
– Zucchini Sticks
– Pull-Apart Garlic Bread
– French Fries
– Sweet Pork Ribs
and for even more pizza and pasta recipes, click on this link… Recipe Category • Pizza & Pasta


For ingredient amounts, directions and much more, visit https://clubfoody.com/cf-recipes/caribbean-jerk-chicken-pizza/


Don’t forget to subscribe to our YouTube channel by clicking on this link… Club Foody YouTube
 

Caribbean Jerk Chicken Pizza


Tuesday, February 22, 2022

Pickled Red Onions Recipe • Quick, Easy & Tasty Condiment | Club Foody


If you’ve been following me for a while, you know that I enjoy making my own condiments. There are a few reasons why; I know exactly what goes in, there are no preservatives (bonus!), the ingredients are fresh plus I’m in control of the amount of sodium… too much of it is not good for us!
 
There’s one that I really enjoy making because it’s a great topping for so many dishes and it’s my Pickled Red Onions! This is probably the easiest pickled recipe ever and the results are so delicious! Crispy, tangy and sweet, this condiment is the perfect way to enhance your meal. It’s also “super quick” to make. Prep and cook time takes 10 minutes and then they marinate for 1 hour. They can be used right away or refrigerate for up to 3 weeks… pretty fast isn’t it?
 
There’s an endless list of dishes where you can use this condiment. Here are a few…
When it comes to Mexican food, name them all… well, a lot of them anyway. This condiment is a great garnish for tacos, tostadas, tortas, cochinita pibil, quesadillasnachos, chilaquiles, fajitas, chimichangas, taquitos, burritos, guacamole, Pico de Gallo, refried beans, and many more… Other food items can be topped with these delicious pink little guys are burgers, pizza, wraps, sloppy joes, sandwiches or even paninis, on an avocado toast or bagel with cream cheese, omeletsfalafels, salads, chicken, pork, roast, steaks, etc. As you can see, there’s an infinite choice of dishes you can use them with.
 
The base ingredients for Pickled Red Onions are quite simple. There are only 5 of them; red onion, vinegar, water, sugar and salt. From there, you can always add other ingredients or seasonings to the jars like a chopped jalapeño pepper, a whole or sliced clove of garlic, a few whole peppercorns, some fresh or dry herbs like thyme, etc. Personally, I prefer plain and simple but sometimes though, I will substitute a ¼ to ½ cup of vinegar with freshly squeezed lime juice… it adds that extra oomph to it.
 
If you want to mellow out the onion taste, you can always pre-blanch them. I don’t because I find red onions have a mild flavor. Also, by adding “hot” water, the onions get less crispy. If you opt for it, boil some water, place the slices in a strainer over the sink and pour the boiling water over. Let them drain very well before adding them to your jars.
 
These Pickled Red Onions are not only extremely easy and quick to make but they’re also a great condiment to have on hand. They give another dimension of yumminess to your favorite foods! After making them, you’ll see how popular they will become in your house…
Bon Appétit!
 
Here are several more incredible condiment recipe for you to try…
– Homemade Horseradish
– Thai Yellow Curry Paste
– Russian Dressing
– Ethiopian Red Pepper Sauce
– Homemade Dijonnaise
– Corn Syrup
and for even more canning recipes, click on this link… Recipe Category • Canning


For ingredient amounts, directions and much more, visit https://clubfoody.com/cf-recipes/pickled-red-onions/


Don’t forget to subscribe to our YouTube channel by clicking on this link… Club Foody YouTube
 

Pickled Red Onions


Thursday, February 17, 2022

Creamy Polenta Recipe • Tasty Italian Dish! | Club Foody


Years ago, David and I were at one of our favorite restaurants in Seattle and he ordered his main course that came with a side dish. I’ve had that side before but never knew how to make it. When we returned back to Canada, I rolled up my sleeves and made it. Yikes, that well-known delicious side turned into sticky goo and it took me a few months before I decided to give it another try. It was better but not great. After a few more tries, I finally got it. Here’s my Creamy Polenta!
 
Originally from Northern Italy, this is made with ground flint corn (grits are made from dent corn). It can be served as a bed for sauces like my Lamb Ragù instead of serving it with pasta, with gravies or alongside Short Ribs. Replace your hot oatmeal in the morning with this nice corn porridge topped with nuts and dried fruits with a splash of milk. Another use for this Creamy Polenta is when it cools off, the texture firms up and from there it can be sliced and then baked, pan-fried or grilled.
 
Unless you have someone who has been making it for years, it’s really not obvious. The secret is to stir constantly when gradually adding the cornmeal to the hot liquid. If this step is rushed, you end up with a lumpy mess that is near impossible to dissolve. I use a measuring cup when adding it but I know others prefer to put some in their hand and let it flow in a thin stream. As the cornmeal expands to four to five times its volume, a small amount of it is plenty.
 
I’m a little different than other cooks out there. First I use broth but if I want to serve it as a hot breakfast cereal, I use strictly water. After the cornmeal is all in, I like to add butter and heavy cream instead of at the end because I find the fat from both helps to make the texture “smoother” while cooking. I also cook it for 15 minutes versus many who cook it for 30 minutes – the end result is not grainy at all. Perhaps it’s because I use fine-grind although technically, polenta should be made with medium or coarse-grind.
 
This Creamy Polenta is so flavorful plus it’s easy to make! This tasty porridge is a delicious substitute for mashed potatoespasta or even rice. Next time you want to serve some lamb shank, short ribs, Veal Ossobuco, gravy or bring another dimension to your morning meal, make this recipe…
Bon Appétit!
 
Here are several delicious side dish recipe to try…
– Veggie Orzo Risotto
– Cauliflower & Celery Root Purée
– Indian Basmati with Dry Fruits
– Creamed Peas
– German Spätzle
– Beluga Black Lentil Salad
and for even more International recipes, click on this link… Recipe Category • International


For ingredient amounts, directions and much more, visit https://clubfoody.com/cf-recipes/creamy-polenta/


Don’t forget to subscribe to our YouTube channel by clicking on this link… Club Foody YouTube
 

Creamy Polenta


Tuesday, February 15, 2022

Lamb Ragù Recipe • Hearty & Flavorful Pasta Dish! | Club Foody


I love pasta dishes for a few reasons: there are a wide variety of pasta noodles to choose from, most of the time the dishes are easy and quick to make, there are different gorgeous pasta sauces and there’s also cheese… I’m a cheese lover!
 
When it comes to sauces, the choices are vast. There’s Alfredo, Rosé, Bolognese, Amatriciana, Carbonara, Alio e Olio, Vodka, Pesto, Arrabbiata, Cacio e Peppe, Puttanesca, and many more… So far I’ve shared a few meat-based pasta sauce recipes with you like my quick & easy Bolognese, my Greek Pastitsio and my homemade Pasta Sauce which is another one that doesn’t take too much time. Now here’s one that I really enjoy especially during the winter time… Lamb Ragù!
 
This recipe is incredible! As it cooks slowly for a few hours, the flavors intensify while the juices from the meat add even more flavor to the sauce. This meat-based recipe is a mouthwatering meal to enjoy when it’s cold outside. It pairs so well with pappardelle or tagliatelle. When serving robust sauces like this featured one, you want thicker, larger and long pasta like these two to handle the weight from the ragù although a bed of Polenta can be another delicious choice.
 
This is a recipe you want to start early in the day like around 11 o’clock in the morning or noon because it will cook for a long time. After the meat is seared, the vegetables are sautéed quickly before adding some liquid to it which has to reduce to the point it’s almost gone – this alone takes some time. Then chicken broth is added and from there, it has to cook for 4 ½ to 5 hours on medium-low heat. During that time, there’s more broth added to the sauce to prevent it from drying out. The end results are amazingly delicious! It’s worth the time that it takes to cook it!
 
Lamb Ragù is so hearty with bold flavors. Although I use this type of protein, I also like to make it with other meats like veal, beef or poultry. Using similar ingredients and simmering slowly for hours, it’s a nice change of taste.
 
When the outside temperature drops and you want something with strong flavors, this comforting Lamb Ragù is your answer! Cooking for hours, the beautiful aroma from this thick and rich sauce will make you salivate… it’s the perfect recipe to add to your folder.
Bon Appétit!
 
Here are several more pasta recipes for you to enjoy…
– Frankie’s Macaroni Casserole
– Zucchini Pork Penne
– Turkey Tetrazzini
– Fettuccine alle Vongole – Clam Fettuccine
– Italian Stuffed Pasta Shells
– Gnudi aka Malfatti
– Coffee Beef Stew
and for even more pasta recipes, click on this link… Recipe Category • Pasta & Pizza


For ingredient amounts, directions and much more, visit https://clubfoody.com/cf-recipes/lamb-ragu/


Don’t forget to subscribe to our YouTube channel by clicking on this link… Club Foody YouTube
 

Lamb Ragù


Saturday, February 12, 2022

Jasmine Rice • How to Cook Perfectly - Tips & Tricks | Club Foody


Rice is a popular, delicious grain that is perfect as a side as well as an ingredient for many recipes. There’s a wide variety available and the most common types are brown, black, red cargo, wild, sushi, arborio, basmati, patna, bomba, rosematta, Carolina gold, and many more. Today, we’ll focus on Jasmine Rice and How to Cook Perfectly!
 
Jasmine Rice is a type of long-grain with a subtle fragrance to it found across South East Asia like Thailand, Vietnam, Laos and Cambodia. Often this rice is labeled as a side dish and pairs so well with many dishes like Chicken SataySweet Pork RibsDakgangjeongSweet Chili Chicken BitesChar Siu PorkGeneral Tso’s ChickenSweet & Sour Pineapple Pork, etc. I also like adding a scoop to my Red Beans dish… yummy!
 
In Jasmine Rice • How to Cook Perfectly episode, I’ll be highlighting a few important steps so you can achieve fluffy rice instead of a gummy one…
 
– Rinsing: Place the rice in a fine sieve sitting over a bowl and fill the bowl with enough cold water to cover it. Swish the grains around with your fingers and then empty the bowl; repeat 2 to 3 times more. When making fried rice, I highly suggest rinsing until the water runs completely clear so the grains cook separately.
Here’s the debate about rinsing… Some claim it doesn’t make any difference to fluffiness and will make it gummier. I find it does because by rinsing the rice before cooking it gets rid of any excess starch which would make the rice sticky and gummy after it’s cooked.
 
The important step to do after rinsing is…
– Drying: Let the rice drain and dry out in the sieve for about 10 to 15 minutes. Do not rinse after and add directly to a saucepan with water.
 
– Ratio: Compared with some other long-grains, Jasmine is softer and thicker therefore it requires less water when cooking. In order to get a nice fluffy, smooth and tender rice, the proper rice-water ratio is very important. While basmati rice is 1 : 1.5 (1 cup rice to 1 ½ cups cold water), the ratio for jasmine rice is 1 : 1.25 ( 1 cup rice to 1 ¼ cups cold water). It’s a little less but it makes a big impact on the end results.
 
Cooking…
– Stovetop: After adding the right water to rice ratio (1 : 1.25), stir very well and bring the mixture to a boil. As soon as it starts bubbling, cover and turn the heat to LOW. Let it simmer between 10 to 15 minutes or until all the water is absorbed. Remove from the heat and let the rice rest, covered, for 10 minutes before gently fluffing it up with a fork.
 
– Instant Pot: The water to rice ratio is different when it comes to an instant pot because it seals in the pressure therefore less water is lost to evaporation. The ratio for Instant Pot cookers is 1 : 1 (1 cup rice to 1 cup cold water). After spreading out the rice evenly, cover and set the valve to “sealing”. Click on “manual” and set it on high pressure for 5 minutes then allow 10 minutes of natural pressure release.
 
– Rice Cooker: The ratio is the same as with an Instant Pot. Stir the rice, cover and cook according to the manufacturer’s instructions. Usually it’s around 25 minutes of cooking time in a rice cooker. Let it rest 10 minutes before fluffing it up.
 
To cook the perfect amount needed, here’s the equation. For every one cup of uncooked rice, you’ll get about 3 cups cooked which is roughly 3 to 4 servings as a side dish.
 
The task is surely simplified with this episode on Jasmine Rice • How to Cook Perfectly. With the proper water to rice ratio, you’ll end up with tender and fluffy rice without it being gummy and sticky. If you want more flavor in it, add a pinch of salt to the water or cook the rice in vegetable or chicken broth.
Bon Appétit!
 
Check out these other helpful tips & tricks…
– How to Poach & Shred Chicken the Easy Way
– Leftover Gravy Solution
– Blanching Tomatoes for Cooking & Canning – How to
– Seed a Pomegranate without the Mess
– How to Trim, Cut & Clean Leeks
– Kiwifruits – How to Peel Quickly
And for more handy kitchen tips and tricks, click on this link… Recipe Category • Tips & Tricks
 
Don’t forget to subscribe to our YouTube channel by clicking on this link… Club Foody YouTube


Thursday, February 10, 2022

Chocolate Covered Strawberries Recipe • Valentine Favorite | Club Foody


A lot of things are coming up in a few days; Super Bowl is Sunday followed by Valentine’s the next day. Perhaps some of you will have a romantic sporting event or simply have two separate events. Either way, you shouldn’t skip out on having sweet treats like Chocolate BarksDulce de Leche TurtlesReese’s Peanut Butter CupsBounty Chocolate BitesCrunchie Bars, or even Chocolate Éclairs. Another one that is incredible is my Chocolate Covered Strawberries!
 
Giving flowers, having a candlelight dinner with a nice bottle of wine and soft music playing in the background is always romantic but let’s face it… adding some chocolate to the menu is a plus for the evening! Making a gorgeous dessert like Black Forest Cake, a mouthwatering Chocolate Raspberry Cake with a Mirror Glaze or a decadent Chocolate Lava Cake with Caramel is great but if you want to enjoy some chocolate without putting too much effort into it, these Chocolate Covered Strawberries is the solution.
 
After washing and draining the berries very well using my kitchen tip, I transfer them to the fridge overnight to allow the moisture to dissipate and dry them out. If there’s any water on the fruits, this will prevent the melted chocolate from sticking. The next day, I bring them back to room temperature before dipping them in melted chocolate. After each one is dipped, I transfer them onto a baking sheet lined with a silicone mat but you can always use parchment paper and put them back in the fridge to harden the chocolate.
 
When it comes to melting the semi-sweet chocolate as well as white chocolate, I put them in two separate microwave-safe bowls, add some oil which prevents it from blooming and getting too hard once it’s cold and then process for 20 seconds. I stir and repeat the same steps until it’s nice and smooth – this usually takes me about 1 minute for the dark and 40 seconds for the white. The brand I use is Ghirardelli for my semi-sweet chocolate but you can also use dark or milk chocolate. For the white chocolate, I buy it every time we go to Mexico – to me, it’s one of the best white I’ve ever had!
 
You might wonder what the term “blooming” means. It’s the discoloration or crystallization caused by unstable temperature and environment. They are two kinds of blooming; fat & sugar. Fat blooming happens when chocolate is exposed to warm temperatures making the fat separate from the other ingredients in the chocolate. Once it re-solidifies, it produces that grayish-white discoloration. Sugar bloom on the other hand is caused by absorbing moisture. Once it evaporates, the sugar in the chocolate forms crystals on the surface. To avoid the chocolate from blooming, store it at a consistent cool temperature to prevent shocking it – your pantry and refrigerator is not the best spot. The good news is, although not pretty to look at, the chocolate is perfectly safe to use and after melting it, there won’t be any differences.
 
Whenever you decide to have your romantic time with your partner in the next few days, spend less than 40 minutes to make these delicious Chocolate Covered Strawberries. It will definitely add a special touch to your evening with a bit of aphrodisiac mixed in… I recommend enjoying these scrumptious little gems without 24 hours – it won’t be hard I’m sure, lol!
Bon Appétit!
 
Here are more scrumptious dessert recipes for you to try…
– Cannoli
– Poached Pears with Caramel Sauce
– Cream Cheese Carrot Cake
– Pavlova
– Chocolate Bourbon Pecan Pie
– Cherries Jubilee
and for even more chocolate recipes, click on this link… Recipe Category • Chocoholic


For ingredient amounts, directions and much more, visit https://clubfoody.com/cf-recipes/chocolate-covered-strawberries/


Don’t forget to subscribe to our YouTube channel by clicking on this link… Club Foody YouTube
 

Chocolate Covered Strawberries