Wow, October is almost over – can you believe it? Before saying goodbye to it, there’s a big Holiday coming up this weekend and it’s Halloween! As much as kids have fun with it, wearing “scary” costumes and make-up, going door-to-door and getting a bunch of candies, adults also enjoy the event! I remember having parties over at my place and displaying all sorts of “creepy” props around the house with some dry ice smoking. On top of that, there were games to play, spooky cocktails & unappealing food served, and of course great music! This year we’re not doing much at all but still, this is the perfect excuse to make some sweet treats at home like Bounty Chocolate Bites, Reese’s Peanut Butter Cups, Dulce de Leche Turtles, Crunchie Bars, etc. Trick or treat, I thought I should make something that my husband’s loved since childhood and it’s Puffed Wheat Squares! I never had them before I met David and I’m glad he introduced me. It’s such a great snack to enjoy! Using a good quality cocoa powder, some Corn Syrup and a few more ingredients, this is the perfect quick treat to make for this weekend. Just some warning… they’re addictive and disappear fast! I bet you can’t stop at having just one! Although it’s very easy to make these Puffed Wheat Squares, there are a couple of things to keep in mind. Cooking time is an important one! First you can’t let the mixture boil too long otherwise the moisture will escape and you’ll end up with hard, dense squares. The best way to test if it’s is done is by dropping a tiny amount of the mixture into a small bowl of very cold water. If it seizes then it’s done. I use the same technique when I make Sucre à la Crème – Butter & Cream Fudge. The other thing is after it’s cooked, add the cereal right away and stir until well coated. If you let the mixture sit too long, it will be harder to stir in the cereal. These Puffed Wheat Squares are a great Canadian treat! It’s right up the same alley as Pouding Chômeur, Butter Tarts, Tarte au Sucre – Sugar Pie or Flapper Pie, Nanaimo Bars, Beaver Tails, Blueberry Grunt, and so on. If you need an excuse to make a delicious and easy treat for Halloween, give this recipe a try… Bon Appétit! Check out these other delicious snack recipes… – Cranberry Cream Cheese Crisp – Spicy Holiday Chocolate Bark – Energy Berry Bites – Ooey-Gooey Cinnamon Buns – Sesame Snaps – Pumpkin & Spice Cream Cheese Muffins – Chocolate Chip Cookies and for even more chocolate recipes, click on this link… Recipe Category • Chocoholic
I’m definitely a real carnivore; from beef to pork, lamb, poultry including venison and game like bison, rabbit, ostrich, elk, etc., I love them all! When it comes to beef, my favorite cut is tenderloin. This is the most tender and lean part of the animal therefore the most expensive cut of beef. I use the center-cut for my Beef Wellington and Chateaubriand. I simply slice the filet into portions and make steaks with it. The small end of the tenderloin which is referred to as the “tail” or “tip” is the tenderest part of the cut. Due to the inconsistency of the size, this part is perfect to use for a nice Steak Tartare, Stir Fry, Steak Salad, Beef Stroganoff, etc. During the summer time, David and I enjoy grilling our steaks on the barbecue but when the coldest months come, I simply grill them on the stove then finish them in the oven. This Filet Mignon • How to cook Perfectly episode is the simplest method to achieve great results with your steaks. It’s really not that complicated and quite fast too. When I was living in Toronto, I briefly worked for a large high-end American steakhouse chain. Wandering into the kitchen, I made the comment to the head chef about the anticipation of the warm weather to come back so I could grill my steaks outside. He looked at me and asked why. I explained that I didn’t know how to cook them inside. He told me to show up before my shift the next day so he can show me the “inside method”. That was so awesome! I was now able to enjoy my Filet Mignon • How to Cook Perfectly all year round! Throughout the years, I did a few experiments. First the steaks have to be at room temperature – it usually takes about 30 to 40 minutes – before going into the hot cast iron pan. Well I decided to go a step further. After the steaks are at room temperature and patted dry with paper towels to remove any moisture which helps them to get a nice crust, I season very well with salt & pepper before transferring them to the fridge for 24 hours. That’s right, a full day! I take them out and let them get back to room temperature again. You won’t believe how amazingly tender the steaks are. Of course, if you are pressed for time, forget about it and stick to the 30-40 minute passive time. The 7 steps for Filet Mignon • How to Cook Perfectly are simple. – First, the cast iron pan is heated on high-heat for a couple minutes – you’ll know when it’s hot enough by placing your hand an inch above. – Add flavorless oil (canola, grapeseed, sunflower or vegetable) and let it start shimmering. When a tiny bit of smoke rises up – Place the well-seasoned filets in the pan and let them sit for 2 ½ to 3 minutes, undisturbed – I’m not kidding… DON’T touch them. This is how we get that gorgeous crust also known as a Maillard reaction. – From there, flip them. If the filets don’t release from the pan, let them sit a little longer. – To enhance the flavor (highly recommended), add butter, garlic cloves and either a sprig of rosemary or thyme. You can discard the cloves and use Garlic Butter instead… yum! We tilt the pan and baste the filets with the butter mixture, spooning it on a few times, before transferring to the oven. – Transferring the cast iron pan to a 450ºF preheated oven. Cook until desired doneness (refer to chart below). – Remove from the heat and let them sit for 10 minutes before serving or slicing so the juices have time to redistribute… voilà! When I serve my Steak Diane or Steak Oscar, this is the method I use. It’s quick and easy and you’ll be surprised how amazing the steaks taste. Filet Mignon • How to Cook Perfectly will help you prepare delicious steaks to enjoy all year round… Bon Appétit! CHART: RARE> 5-6 minutes cook time = 120ºF and the final temperature after resting = 125ºF MEDIUM RARE> 6-7 minutes cook time = 130ºF and the final temperature after resting = 135ºF MEDIUM> 7-8 minutes cook time = 140ºF and the final temperature after resting = 145ºF MEDIUM WELL> 8-9 minutes cook time = 150ºF and the final temperature after resting = 155ºF WELL DONE> 9-10 minutes cook time = 160ºF and the final temperature after resting = 165ºF Check out these other great BBQ & grilling recipes… – Greek Ouzo Pork Kebabs – Hawaiian Teriyaki Burgers – Chicken Chapli Kebab – Fire Roasted Salsa – Turkish Kebabs – Tex-Mex Potatoes – Rotisserie Chicken and for even more beef recipes, click on this link… Recipe Category • Beef
An important thing that makes one relationship better than another is the commonality. The more things individuals have in common, the deeper and stronger the connection becomes. David and I are fortunate to share most of our likes and dislikes. There are a few we don’t agree on and one of them is a popular dessert… Holiday Fruitcake! Our 1st Christmas was so exciting! Getting ready for the celebrations, we decorated, shopped, cooked and planned together. One day while we were out grocery shopping, I was surprised by something he didn’t like. As we got to the bakery section, I saw fruitcakes on a stand. As I was reaching for one to put in the shopping cart, I saw David making a funny face. I asked him what that was all about and he said that he never liked them. Although slightly disappointed (I really like this kind of cake), my brain started to figure out a way to help make him enjoy a long time Holiday favorite of mine. Sure enough, the year after, I was giving my first fruit cake a try… This is one of those recipes that cannot be rushed. If you want a deep, rich flavorful cake, time is the key ingredient – I learned that on my “1st attempt”. It’s essential to macerate the fruits and candied peel in rum, bourbon or brandy for 12 hours. If you don’t want to use alcohol, fruit juices such as orange or pineapple are great options – I use both, alcohol and fruit juices. Before transferring the cake in the oven, I like to place a baking dish on the lower rack filled halfway with hot water and to make the transfer easier, I place it on a baking sheet. Why do that extra step? The water will create some moisture therefore preventing the top of the cake from cracking by expanding too quickly. It’s a method I also like to use when I make cheesecake or sponge cake. If the cake is browning too fast, place a sheet of foil on top of it to prevent from burning. Another important step after baking this delicious Holiday Fruitcake in the oven on low temperature for 3 hours is to nurture it for a few months. What I mean by that is after the cake is done, you either pour your chosen alcohol (stick to the same one… I use rum) over the baked cake and/or inject it in the cake. You don’t have to do it at all but I’m telling you, it gives an amazing flavor to this dessert. Make sure to wrap it properly with plastic wrap and aluminum foil after each “booze treatment”. When it comes to decorating, it’s a personal choice. Before it goes into the oven, I like to place glazed cherries around the edge, alternating the colors. Then I place pecan halves in another circle inside the first one and finish off with more cherries in the center. Some of you might want to skip the fruit-nut topping and opt for either a buttercream frosting, bring a British flare to it by covering in marzipan and then royal icing, or simply using fondant… again, it’s your cake and your choice! For this coming Christmas, surprise your loved ones with this incredibly delicious homemade Holiday Fruitcake! If you think this is gonna be just like your grandma’s fruit cake… it’s definitely not! Bon Appétit! Check out these other delicious sweet Holiday recipes… – Sucre à la Crème • Butter & Cream Fudge – Panettone – Black Forest Cake – Oliebollen – Spicy Holiday Chocolate Bark – Pavlova – Chocolate Rum Snowballs and for even more dessert recipes, click on this link… Recipe Category • Dessert
My parents didn’t raise us with fast food – everything was pretty much homemade. Once in a while my mother bought prepared foods like Hamburger Helper, frozen Chicken Pot Pies, or those Oven Baked Beans that came in an amber jar. Once or twice a year, my father was either buying a big bucket of KFC with fries, Coleslaw with Pasta & Potato Salad or taking us to Chinatown located in downtown Montréal. On very rare occasions, we went to Harvey’s or Ponderosa Steakhouse. Again, they did prefer serving us homemade food which tasted much better anyway! Back in the 70s’, McDonald’s launched the “Happy Meal” that went viral with young people. Parents were “happy” too because it wasn’t expensive plus the kids loved it as it not only came with a small burger and small fries but also cookies and a toy were in those cute little boxes. My brother Daniel loved it and that “promo” hooked him to this fast food chain until his late teens. My first experience at McDonald’s wasn’t anything fantastic. Already a foody hiding in the closet, I disliked their burgers until I tried one item… the Filet-O-Fish Sandwich! I liked it but still, it wasn’t my cup of tea to go out of my way to have one. When David and I just started our lives together, we went to McDonald’s on a road trip and had a very bad experience – never went back. Several years later, I actually craved a Filet-O-Fish Sandwich and decided it was time for me to make one at home. My first attempt was pretty decent… I just needed to work on my breadcrumbs. The next time I made it, it turned out perfect, actually it was even better because I knew exactly what the ingredients were – from my homemade Brioche Buns although you can always use Hamburger Buns instead to the kind of fish I chose, my delicious Tartar Sauce along with my French Fries. Even David, who never really liked this sandwich, was devouring it… Score! Here are a couple of things I’d like to point out. When it comes to breadcrumbs, I lightly toast them in a small skillet for about 4 to 5 minutes. The crumbs will get darker when baked in the oven. Now, let’s talk about the fish… If you want a nice moist and flaky fish, an important step to do before cooking it is to pat it dry with paper towels. This little step prevents the texture from getting mushy and tough. It applies not only when making a Filet-O-Fish Sandwich but every time you handle fish including scallops. Making a Filet-O-Fish Sandwich is easy plus you know your ingredients are fresh. Another bonus for making it at home is it’s cost effective… you’re saving money! If you’re not a “fast food junkie” but occasionally enjoy this sandwich, you’ll definitely love it more with this recipe… Bon Appétit! Check out these other delicious sandwich recipes… – Croque-monsieur Montréal Style – Mexican Chicken Sub – Moo Shu Pork Tortillas – Grilled Brie, Ham & Pear Sandwich – Shrimp Po’ Boy – Hawawshi and for even more sandwich recipes, click on this link… Recipe Category • Sandwiches
Garlic is good for us. In ancient times, it was mainly used for medicinal purposes and even now, we all know that garlic helps to combat the common cold. It helps to reduce blood pressure and cholesterol levels. It has fiber, vitamin B1, B6 & C, manganese and selenium plus potassium, calcium, phosphorus and iron along with antioxidants. These modern days, we use it to enhance dishes. I love garlic and cook with it a lot. Most of the time, I either sauté, roast or toast it. I also use it raw in certain recipes like Tahini or Tzatziki Sauce, Aioli, in the making of Garlic Herb Butter, Creamy Spicy Guacamole, Italian-Style Bruschetta, in soups like my Sopa Ajoblanco (White Gazpacho), Caesar Salad, Ceviche de Pescado, Roasted Red Pepper Hummus, etc. As much as I enjoy its strong flavor, there’s one thing I don’t appreciate and it’s the bitterness from it. When fresh, there’s no issue but when the cloves start aging, the flavor can turn harsh. To prevent this unpleasant taste, the method I use is this one… Blanched Garlic • How to. This step is extremely easy. After boiling the water in a pot, we add the “unpeeled” cloves and boil them for 5 minutes. We remove from the heat and rinse them under cold water to stop the cooking process before peeling and proceeding with our recipe. My “Blanched Garlic • How to” method is slightly altered and quicker compared to others. Let’s see what I do differently… Some use milk in lieu of water… I’ve never seen any improvement on the end result by using milk therefore I prefer using the “cheaper” ingredient. Another test I did was to add cloves in cold water, bring to a boil and as soon as it starts simmering, remove from the heat, rinse them under cold water and repeat two more times. Again, I didn’t really see any major variance in taste by triple blanching them versus letting the cloves boil for 5 minutes. Lastly, many chefs will peel the cloves before blanching… I leave them unpeeled because once again, I don’t see any impact plus after they’re rinsed under cold water, peeling them is a breeze. If you decide to blanch more than you need, you can refrigerate them. After rinsing the cloves under cold water and peeling them, place them in an airtight container and transfer to the fridge for up to 3 to 4 days. They can also be frozen by covering them in oil. Blanched Garlic • How to is a method I use when raw garlic is added to some of my recipes. It’s quick and a nice way to smooth out the harshness from it. It makes it less pungent and mellows out the taste, while keeping the beautiful aroma that garlic has. Bon Appétit! Here are a few tips and tricks that can be quite helpful… – How to Poach & Shred Chicken the Easy Way – Perfect Whipped Cream Every Time – How to – Measuring Honey, Syrup or Molasses without Sticking – Seed a Pomegranate without the Mess – Beets ~ Prep & 4 Ways to Cook – Defrosting Meats Quickly and for more handy kitchen tips and tricks, click on this link… Recipe Category • Tips & Tricks Don’t forget to subscribe to our YouTube channel by clicking on this link… Club Foody YouTube
When the cold months arrive, there’s nothing better than a delicious casserole. I have a great array of recipes to choose from like my Cassoulet, Lamb Keema, Frankie’s Macaroni Casserole, Hamburger Helper Copycat, Shepherd’s Pie, Southwest Beef Casserole, Meat Manicotti, Eggplant Rollatini • Involtini di Melanzane, Tuna Casserole, Turkey Tetrazzini, and many more… I love them all but there’s another one that I go crazy for because it’s so incredible and it’s Pastitsio! This meat pasta dish is so delicious because it has several layers of yumminess! First the bucatini pasta is laid down before spooning on a hearty meat sauce made with ground beef, ground lamb and other great ingredients. It would be tasty as is, but there’s another awesome layer added… a beautifully rich Béchamel Sauce sprinkled with Kefalotyri cheese which gives a nice salty addition to it. The meat sauce has amazing ingredients. First, there’s a mix of ground beef and lamb. Most recipes out there use strictly beef but by adding both, it brings more flavor to it. There’s also a bunch of herbs and spices in this one but what sets it apart from the other sauces is the added cinnamon and cloves. It gives a unique taste to the sauce, making it very “Greek”. Another aspect is that the texture is much thicker. The reason behind this is to have the layers distinctly separated for a nice, neat presentation. Let’s talk about a couple of possible substitutions here… Bucatini pasta looks like spaghetti but with a hole running through the center. The long narrow tube gives the traditional look of the Pastitsio dish when served. I use #2 and the best place to find it is at specialty grocers or online. If you can’t find any, don’t despair. To recreate a similar resemblance, ziti or penne can be used instead. When it comes to cheese, I like to use the traditional Kefalotyri which is perfect for this recipe! It’s made from goat or sheep’s milk. Others prefer using Kasseri… I’m not a fan of it! In case you can’t find these cheeses, a great substitute is either Parmesan or Romano… They’re similar in texture and have the same sharp flavor. Oh my, I can see my Greek girlfriend Maria raising her eyebrows in disapproval. Joking aside, it’s totally fine to use either one although they’re saltier than Kefalotyri cheese. After years of making Pastitsio, I recently found out that Béchamel Sauce wasn’t a traditional ingredient until the early 1900s’. Influenced by French cuisine, a well-known Greek chef named Nikólaos Tselementés, put a modern twist on this mouthwatering dish. He also introduced other French recipes to Greek home cooks. Assembling the dish is quite easy. First you need a 9×13-inch baking dish but it has to be deep enough, about 2 ¾-inch to 3-inch high – I use a Le Creuset Rectangular Roaster. After the noodles are cooked, they are tossed with egg whites and cheese. These ingredients help the pasta to stick together better when it’s time to cut and serve. From there, they’re laid out in the dish lengthwise in one direction to get that nice visual effect. Then the meat sauce is evenly spooned over followed by some cheese and then comes the béchamel and finally more grated cheese is sprinkled on top. It’s baked in the oven for 45 to 50 minutes at 350ºF before putting it under low broil for 5 to 8 minutes or until nicely browned. It’s then removed from the heat to rest for at least 15 minutes. The longer it sits, the better it will hold its shape when it’s time to cut it for the typical presentation of this traditional dish. If you’ve never had this rich casserole before, it has to be on your “must try” list this season. This Pastitsio is packed with wonderful flavors! It’s like having Italian lasagna in a Greek way. After you try this gorgeous baked pasta dish, you’ll understand why I love it so much…. Bon Appétit! Here are several more delicious Greek inspired recipes for you to enjoy… – Avgolemono Chicken Soup – Greek Ouzo Pork Kebabs – Prawn Saganaki – Greek Lemon Rosemary Potatoes coming on May 19th, 2022 – Greek Pizza – Spanakopita – Greek Dolmades with Avgolemono Sauce and for even more pasta recipes, click on this link… Recipe Category • Pasta & Pizza
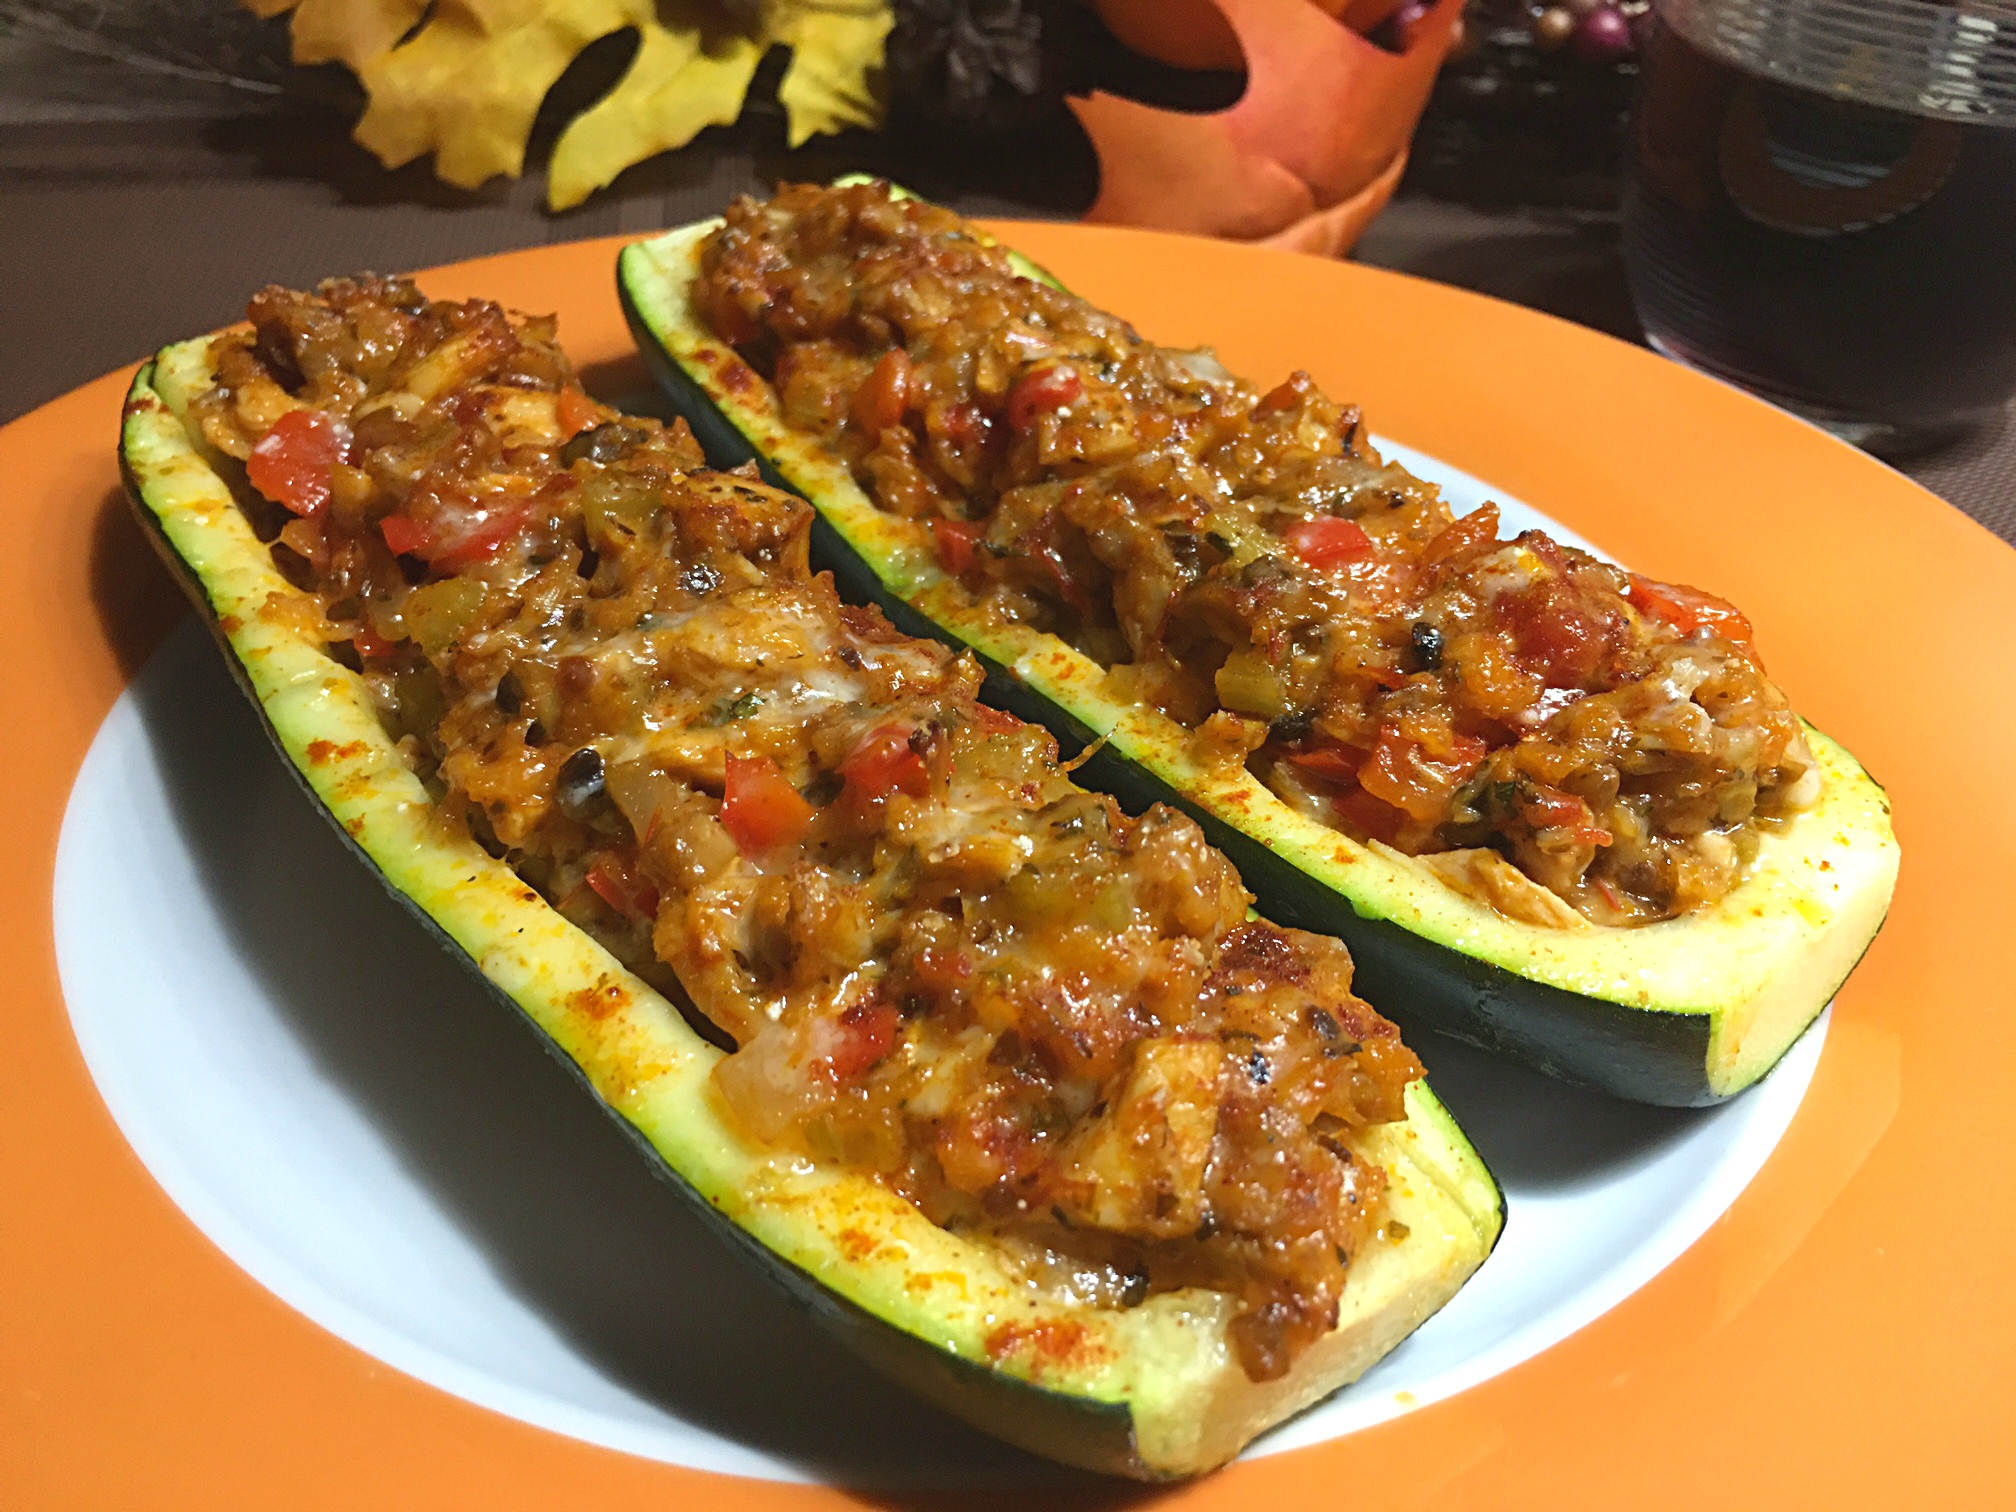
David and I have different outlooks towards Thanksgiving. While he’s like a big kid and can’t wait for this Holiday to arrive so he can enjoy the Turkey dinner with all the goodies, I’m the opposite… I’m very apprehensive about Thanksgiving and can’t wait for the day to be over. By the time dinner is served, I’m tired, not really hungry and just want to sip my glass of wine so I can finally chill out! The only great outcome from the Holiday is for the next few days I don’t really have to cook anything and simply reheat the leftovers because, YES, there is always leftovers especially the turkey meat! Unfortunately, I get bored very easily. Having the same meal over and over is so unexciting. I have to diversify our menu… That is when I like to use up the leftover meat and create other dishes with it like Turkey Tetrazzini, Turkey à la King on Toast, Turkey Chili Tex-Mex Style, Turkey Croquettes, Turkey Pot Pie, Club Sandwich with Chipotle Mayo with turkey meat, Turkey Noodle Soup, and so on. Now here’s another delicious recipe to add to the list… my Turkey Zucchini Boats! This recipe is amazing! It’s a beautiful combination of ingredients and the flavors are incredible! After washing the zucchinis, cutting off the ends and slicing them in half lengthwise, we remove the flesh, leaving about a ¼-inch border around the edges. From there, we cook the filling using cooked turkey meat, stuff the “boats” and finish them in the oven with some grated cheese on top… yum! When cooking the ingredients for the filling, you can always reuse the zucchini flesh; chop it and add it to the mixture when cooking. I don’t use it for my Turkey Zucchini Boats recipe. Instead, I reserve it for other recipes like when I make a frittata, some zucchini fritters, my zucchini carrot bread, in a Bolognese sauce, or this gorgeous Lebanese dish called Lib el-Kousa. Definitely don’t toss the flesh and simply freeze it if you don’t use it right away. Talking about freezing… these Turkey Zucchini Boats can go to the freezer. After they’re baked, let them cool completely before storing them in a single layer in an airtight container. They’ll keep for up to 3 months. Now that’s a dish that is fun to eat! Stuffed with a flavorful mixture, these Turkey Zucchini Boats are certainly a nice way to change the monotony of eating the leftover meat. It can be served as an appetizer as well as a main dish with a green salad. Don’t despair with the ton of turkey meat sitting in your fridge and reuse it to make this mouthwatering dish… Bon Appétit! Check out these other delicious poultry recipes… – Chicken Française – Roast Duck with Marmalade Glaze – Chicken Stuffed Crêpes with Poblano Sauce – Duck Breast with Blood Orange Sauce – Chicken with Creamy Mushroom Garlic Sauce – Asian Chicken Salad and for even more poultry recipes, click on this link… Recipe Category • Poultry