Thursday, March 28, 2024

Broccoli & Cauliflower Casserole Recipe • So Tasty! | Club Foody


Often, a side dish completes a dish but many times, it can be the star 🌟 of the meal! As much as I enjoy prioritizing the protein, I also like to put the meat in the back row and put my side dish under the spotlights!
 
Casseroles are a good example of bringing a simple steamed fish 🐟, an oven-baked chicken or simply grilled pork chops to an amazing feast. I think of a Vegetable Tian, my lovely Sweet Potato Casserole, a nice Italian Caponata, my Onion Soufflé, the famous Scalloped Potatoes, and many more.
 
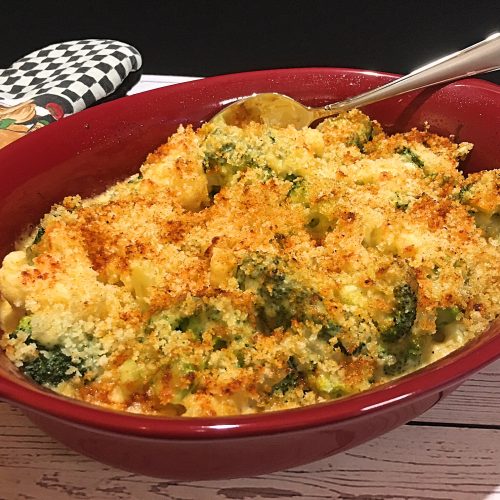
Another one that is amazingly comforting that has my guests returning for seconds… and thirds is my delicious Broccoli & Cauliflower Casserole! It doesn’t matter if it’s Easter 🐰, Thanksgiving or during the Holidays, this recipe is always celebrated!
 
This casserole is totally a “wow” 😍! Not only is it very easy but also so tasty and satisfying! What takes the most time is to cut the vegetables into medium-size florets – don’t go any smaller or else they won’t hold their shape. After that’s done, they’re steamed for a few minutes and set aside while making the sauce.
 
What makes this delightful Broccoli & Cauliflower Casserole is obviously the cheese sauce 🧀. There are a few things I’d like to highlight. When the flour is added, it’s important to stir constantly for a couple minutes to remove the raw taste from it otherwise it will taste floury and it’s not really the flavor profile we’re looking for.
 
After the milk and chicken broth are stirred in the mixture, make sure there’s no lumps before adding the cheese. I normally mix for a couple minutes as well. I don’t use a whisk as the onions 🧅 tend to stick between the wires.
 
Anytime cheese is added to a hot mixture, it’s crucial to add a small amount at a time, stir well until it’s melted before adding more. Also reduce the heat or turn it off. These two tips will prevent the cheese from separating or getting grainy and you’ll end up with a nice smooth and creamy texture 😉.
 
I like using what ever I have in my cheese drawer. For a colorful presentation, yellow cheese is the way to go but nothing is stopping you from using white instead. Do not, and I repeat, do not use pre-grated cheese! To prevent the cheese from clumping, manufacturers add cellulose which is essentially wood pulp… Frankly, I’ve never bought any of those bags and I’m not about to.
 
This Broccoli & Cauliflower Casserole is perfect for any occasion! It’s creamy, colorful and delicious 😋… a perfect side for your proteins! Also, this casserole is a lovely way to enjoy these healthy vegetables in a flavorful cheese sauce!
Bon Appétit! 🍽
 
Here are several more incredible side dish recipes for you to enjoy… 😀
– Pilau Rice
– Sambal Green Beans
– Fondant Potatoes
– Aloo Gobi
– Quick & Easy Bok Choy
– Spring Pea Salad
– Baked Autumn Veggighetti
and for even more side dish recipes, click on this link… Recipe Category • Sides & Vegetables


For ingredient amounts, directions and much more, visit  https://clubfoody.com/cf-recipes/broccoli-cauliflower-casserole/


Don’t forget to subscribe to our YouTube channel 📽 by clicking on this link… Club Foody YouTube
 

Broccoli & Cauliflower Casserole


Tuesday, March 26, 2024

Pizza Rustica Recipe • A Traditional Italian Easter Pie | Club Foody


Easter is a well-celebrated Holiday around the world. If you religiously follow the tradition, Easter is the conclusion of Lent which is a 40-day fast. I remember some of my great-aunts cutting out certain foods 🍩 or activities (no more bingo during that time period) to mimic Jesus’s journey into the dessert.
 
To commemorate the end of the fast, an assortment of delicious meals and sweets will be enjoyed 😋. In Britain, there’s Hot Cross Buns while in Greece, it’s Tsoureki. Pashka is a traditional one in Russia whereas in Mexico, its Capirotada. In our backyard, we like our Easter Ham.
 
In Italy, the list is quite long 📜. There’s Italian Wedding Soup, Pizzelle, Torta Pasqualina, Scarcella, Columba di Pasqua, Impanata Ragusana, Tiramisu, Abbacchio a Scottadito, Ricotta Pie, Lemon Gelato, Limoncello Panna Cotta, and many more including this one… Pizza Rustica!
 
This pizza is certainly not your ordinary everyday pizza. This southern Italian recipe is stuffed with a delicious assortment of meats and cheeses plus a few added ingredients. Typically made the day before and served at room temperature the next day, this is an incredible meal to enjoy on Easter Sunday 🐰.
 
The crust is what takes the most time ⏰. It’s similar to my Foolproof Pie Dough recipe with a few small changes. After it’s done, it’s rolled out to about 18-inch round by 1/8-inch thick – the pizza is pretty big! The size of the springform I use is 10 x 3 so all the goodness can fit in it.
 
The filling for the Pizza Rustica is slightly different from the traditional recipes. Besides using ham, pepperoni and salami (prosciutto or mortadella can also be added), I add other unconventional ingredients. There’s Hot Italian Sausage along with sautéed onions, peppers and garlic 🧄. After being well drained, they go into a big bowl.
 
After the meats come the cheeses 🧀. I opt for ricotta, also well drained the day before making the recipe, Mozzarella and Parmesan. Other times, I might swap the Mozza for Fontina and the Parmesan for Parmigiano Reggiano.
 
There are also seasonings that go into the bowl… Italian seasoning, freshly ground black pepper and fresh chopped parsley. I don’t add any salt for one simple reason… the deli meat including the cheeses are loaded with sodium but if you’re a salt junkie 🧂, go ahead!
 
When the top crust is placed, folded, crimped, and brushed with egg wash, it’s now transferred to a 450ºF preheated oven. As soon as the torta is in the oven, the temperature is reduced to 350ºF. From here, it’s baked for 1:15 hours to 1:20 hours or until the top crust is golden brown 🥧.
 
It’s placed on a wire rack to rest for 15 minutes before unlatching and removing the collar. When it’s time to transfer the pizza to a stand or serving plate, I like to wait a good 45 minutes. I simply use a very hard plastic spatula that I slice between the bottom of the pie and the pan and carefully move it to its final destination.
 
Made the day before and served at room temperature on Easter Sunday, this Pizza Rustica is the perfect meal to enjoy! With a multitude of delicious ingredients, piled high and deep, this is a flavorful Italian recipe to make for the occasion! Surprise everyone by serving this mouthwatering pie! 😉
Bon Appétit!🍽
 
Here are several more Easter recipes for you to enjoy…😀
– Gougères aka Cheese Puffs
– Grand Curaçao Orange Glazed Ham
– Baked Greek Pita Wedges
– Mediterranean Leg of Lamb
– Paçoca
– Roast Beef with Fresh Herbs
– Crown Roast of Pork
and for even more holiday-ish recipes 🐰🎄, click on this link… Recipe Category • Holidays & Events


For ingredient amounts, directions, and much more, visit  https://clubfoody.com/cf-recipes/pizza-rustica/


Don’t forget to subscribe to our YouTube channel 📽 by clicking on this link… Club Foody YouTube
 

Pizza Rustica


Thursday, March 21, 2024

Maple Walnut Cake Recipe • A Maple Celebration! | Club Foody

As you know, I’m originally from Québec also known as “La Belle Province”. Besides being mostly French speaking, this province has a lot of traditions and events unique to it like Saint Jean Baptiste on June 24th, Corn Roasting 🌽, Winter Carnival, and others including Sugar Shacks!
 
March is the beginning of this delicious event! People gather in large rustic log cabins, sitting down at long wood tables covered with red-white checkered tablecloths. While live music 🎵 is playing in the background, traditional Québec dishes are brought to the patrons.
 
Most “cabane à sucre” (sugar shacks) offer an all-you-can-eat menu. You’ll find Pea SoupBaked BeansOmelets or Scrambled Eggs with maple-baked Ham and Bacon 🥓 plus Sausage soaked in maple syrup, Creton, Boiled Potatoes, Tourtière (meat pie), Oreilles de Crisse (deep-fried pork rinds), Foie Gras, plus condiments like ketchup, pitchers of maple syrup (like it’s not sweet enough as it is, lol), fresh Crusty Bread, butter, etc.
 
When it comes to dessert 🍰🍩, there are a long list of deliciousness such as Pouding Chômeur (poor man’s pudding), Tarte au Sirop d’Érable (maple syrup pie), Grand-Pères (maple syrup dumplings), Maple Ice Cream, Crêpes, Butter Tarts, and many more plus stepping outside to get maple taffy on snow rolled on a small popsicle stick… yum!
 
Here’s another sweet treat for the occasion… my Maple Walnut Cake! With a good dose of maple syrup, this incredibly scrumptious cake fits right in with the sugar shack event. With a nice creamy Maple Syrup Frosting along with some Maple Glazed Walnuts, this is a dessert perfect for any maple syrup lover 💖!
 
Being the main star, maple syrup is everywhere; in the cake, frosting and decoration. Table Syrup or Pancake Syrup is far from the real Maple Syrup… here’s why.
– First, there’s no maple in it!
– Second, they’re often made with corn syrup and high-fructose corn syrup along with preservatives and additives like cellulose gum (thickening agent) and sodium hexametaphosphate (for texture). Maple Syrup has only one ingredient… guess what it is?
– Third, they don’t taste the same. Maple syrup has a clean complex, deep and rich flavor with hints of caramel, vanilla and a light buttery background. I prefer dark color for a more robust taste.
– Lastly, there are no health benefits in Table Syrup or Pancake Syrup. On the other hand, maple syrup has lots of minerals and antioxidants such as manganese, potassium, calcium, zinc and iron plus it’s natural 💚.
 
Price point, of course the commercial ones are cheaper. The reason why the “real stuff” is so pricey is due to harvest. After the maple is extracted from the trees 🌳, it is then boiled to create the final product. It takes about 40 gallons of maple water to produce one gallon of it.
 
I know it’s more money 💰 but it’s so worth it! If you might think that’s too much, skip Starbucks for a week or bring your lunch to work. I think making compromises to eat better is a responsibility towards ourselves and helps prevent illness.
 
Back to the making of the Maple Walnut Cake…
After greasing 2 3×8-inch cake pans with butter, parchment paper rounds are placed at the bottom. My method is different from most people so you might want to check by clicking the link: Parchment Paper Rounds for Cakes. After the batter is evenly divided between the cake pans, it’s baked for 26 to 28 minutes ⏰. It takes more time than regular cake batter for one simple reason… the added maple syrup.
 
While they’re in the oven, the Maple Glazed Walnuts are made. This is a quick and super easy recipe as it takes only 6 to 7 minutes for the caramelization to be done with only 3 ingredients. Besides using them as a cake decoration, they’re also amazing with a charcuterie board or just by themselves 😉.
 
The final step to making this cake is the frosting. This takes a little longer but the end results are so delicious 😋! It’s important to add the sugars a little at a time and process until nicely blended – that’s the part that takes time.
 
At one point, the mixture will get very, very dry and this is when we add half of the maple syrup. When we’re left with a little of both sugars, we then add the remaining ingredients including vanilla extract which can be substituted with maple extract. If the frosting is too thick, add a tablespoon of maple syrup at a time to get the desired consistency.
 
This Maple Walnut Cake is incredibly scrumptious! With a gorgeous maple flavor 🍁, this dessert is perfect for celebrating the sugar shack season in Québec. It’s also a delightful sweet treat to welcome in the Spring season!
Bon Appétit! 🍽
 
Check out these other scrumptious cake recipes… 😀
– Lamington Cake
– Creamy Cheesecake
– Chocolate Beet Cake
– Red Velvet Cake
– Tropical Pineapple Upside Down Cake
– Blueberry Cake
– Black Forest Cake
and for even more dessert recipes 🍩🍰, click on this link… Recipe Category • Dessert


For ingredient amounts, directions, and much more, visit  https://clubfoody.com/cf-recipes/maple-walnut-cake/


Don’t forget to subscribe to our YouTube channel 📽 by clicking on this link… Club Foody YouTube
 

Maple Walnut Cake


Tuesday, March 19, 2024

Moules (Mussels) à la Provençale Recipe | Club Foody


Seafood is one of my favorite food categories! All right, all right… all categories are my favorites but I have to admit that seafood is always a treat for me! I reserve it for special occasions like anniversaries, birthdays 🎈, Holidays, “me” day, etc.
 
Seafood refers to all fresh and saltwater fish, crustaceans and mollusks although in North America, we like to separate them into fish & seafood 🦞. Mollusks also known as shellfish are very tasty. It includes oystersmussels, cockles, clams, periwinkles, limpets, scallops, abalones, and snails which in French, is escargot.
 
When it comes to mussels, they’re simply wonderful 🤩! You can make Mussels Fra Diavalo, Moules Marinière, Thai Coconut Mussels, Paella de Marisco, Creamy Vermouth & Tarragon Mussels, Bouillabaisse, Mussels Escabeche, Mussels in Curry Sauce, Seafood Risotto Stew, etc.
 
Another recipe that David and I really enjoy 💖 is my Moules (Mussels) à la Provençale! Simple to make and yet amazingly delectable, this is perfect when entertaining, on date night, or just when you want a quick meal! It’s another French recipe that you should put on your “to do” list…
 
This lovely recipe can be served either way… as a starter or a light meal. If you serve it as an appetizer, the recommended portion per person is ½ pound. As a main course, it’s roughly between 1 to 1 ¼ pounds per person.
 
Moules (Mussels) à la Provençale is a fairly quick ⏳ and easy recipe. What takes the most time is to prep the mollusks. Although they’re highly perishable, they can be cleaned and debearded late on the day before cooking. When done, place them in a bowl and cover with a damp clean kitchen towel, making sure it touches the surface.
 
Here’s the famous question… How to clean them and know if they’re still safe to eat?
First, place them in a colander and run cold water 💧 over, rubbing off any debris on their outer shells such as sand, barnacles, seaweed or mud spots. To debeard, hold it firmly between your thumb and forefinger and pull it towards the hinged-end of the shell. If it’s too stubborn, use some dry paper towel.
 
Let’s find out if they’re safe to eat… If some of them are open, lightly tap the little guy against the side of the sink. If it’s alive, it will close up due to the vibration. On the other hand, if it doesn’t react and close, simply discard it. They tend to open when they’re dead.
 
Either as a starter or a light meal, these Moules (Mussels) à la Provençale are a pure delight! This Provencial French recipe is incredibly mouthwatering! It’s a quick and easy way to prepare mussels that every seafood lover will enjoy! Oh, and don’t forget to serve them with toasted crusty bread to sop up the gorgeous sauce… yum! 😋
Bon Appétit! 🍽
 
Check out these other amazing seafood recipes… 😀
– Escargot con Funghi in Vol-au-vent
– Lobster Newberg
– Shrimp Martini with Robuchon Mashed Potatoes
– Fettuccine alle Vongole – Clam Fettuccine
– New England Crab Cakes
– Prawn Saganaki
– Seafood Pizza
and for even more seafood & fish recipes 🦞🐟, click on this link… Recipe Category • Seafood & Fish


For ingredient amounts, directions, and much more, visit  https://clubfoody.com/cf-recipes/moules-mussels-a-la-provencale/


Don’t forget to subscribe to our YouTube channel 📽 by clicking on this link… Club Foody YouTube
 

Moules (Mussels) à la Provençale


\


Saturday, March 16, 2024

Cooking is fun but also complex. There are many things to learn, techniques to master, having the right equipment and kitchen tools 🔪, understanding the seasonings, and much more. Besides that, there’s also a few cooking methods to know like sautéing, steaming, braisingpoaching, stir-frying, roasting, and so on.

 
Depending on the application, many times vegetables or fruits 🍐 have to be blanched prior to cooking or freezing. It’s a simple method that stops enzyme action which in turn helps to keep the flavor and brighten the color, remove microorganisms, and preserve nutritional value.
 
When I use certain vegetables 🥦 or fruits 🍅 like asparagustomatoes, broccoli, peaches, cauliflower, and many others, I take that little (it’s very quick) extra time to do the blanching cooking technique. The same applies with Green Beans • How to Blanch!
 
We cook often with these little green guys. They’re good for us as they’re full of antioxidants and fiber 💚, high in vitamin K plus have a great amount of calcium besides having chlorophyll and other vitamins. I usually like to steam them but if I have to freeze them or use as pickles or in a recipe, then I blanch them.
 
Green Beans • How to Blanch is the fastest method of cooking. After trimming the ends and washing them, they’re immersed in a large pot of salted boiling water with about 1 tablespoon of coarse sea salt 🧂. The timer is set according to the recipe.
 
If the veggies are a side dish or used for recipes such as Sambal Green Beans, Green Bean Mushroom & Almond Casserole, Green Beans with Chili-Orange Oil, they can be blanched anywhere between 3 to 5 minutes ⏰ depending on their thickness. If they’ll be pickled like in my Easy Pickled Green Beans, quickly blanch them between 45 to 60 seconds.
 
Green Beans • How to Blanch is a great and easy method to use prior to cooking 👩‍🍳👨‍🍳 or freezing including canning and dehydrating. It takes so little time to achieve amazing results plus all the other benefits that blanching provides.
Bon Appétit! 🍽
 
Here are more links for blanching food…
– Blanched Almonds ~ How to
– Blanching Tomatoes for Cooking & Canning – How to
– Blanched Garlic • How to
– Asparagus • How to Blanch
 
Check out these other great kitchen tips and tricks… 😀
– How to Poach & Shred Chicken the Easy Way
– Secret for Better Grating Soft Cheeses/Butter
– Chocolate Honey Graham Cracker Pie Crust
– Perfect Whipped Cream Every Time – How to
– Beurre Manié
– How to Roast and Peel Peppers
– Prepping Lemongrass – How to
and for more handy kitchen tips and tricks 💡, click on this link… Recipe Category • Tips & Tricks
 
Don’t forget to subscribe to our YouTube channel 📽 by clicking on this link… Club Foody YouTube