Tuesday, May 30, 2023

Israeli Salad Recipe • An Israeli Favorite! | Club Foody


My diet was way different before I met my husband! I was eating 2 to 3 meals of salad a week, one meal of fish 🐟 as well as pasta 🍝 and chicken 🐓, and then one “serious” cheat day! As many of my girlfriends were forcing themselves to eat salads 🥗, it’s always been delicious to me! As much as I enjoy meat, fish, and seafood, salad makes me feel good plus there are so many recipes to choose from…
 
On the website, I probably have over 3 dozen salad recipes and they just keep coming – I think I probably have another 3 dozen on standby, ready to be posted. There’s Strawberry SaladJulienneWaldorfTabboulehAsian Chicken, and many more as well as this one… Israeli Salad!
 
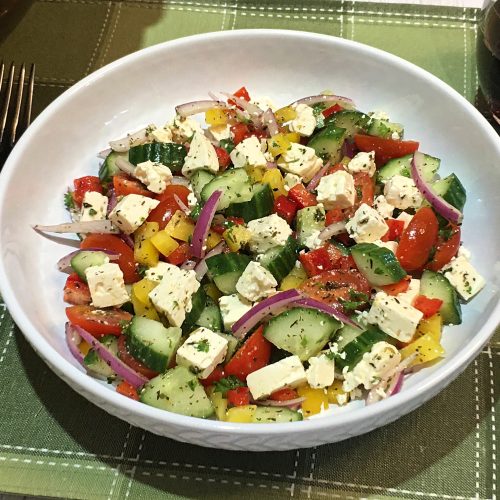
This is an amazing recipe to have on hand! It’s extremely delicious, quick to make and also inexpensive. The big “plus” of this salad is it’s super healthy 💚! With fresh ingredients, homemade vinaigrette, and some feta cheese, this is a bowl of deliciousness packed with nutrients!
 
I love making homemade vinaigrettes and dressings. It takes 5 minutes ⏳ to have a nice fresh sauce for your salads. There’s an ingredient I use that might surprise some of you and it’s dried mint. Dried versus fresh is actually not the same. Although stronger in taste, dried mint has a sweeter earthy flavor with a hint of eucalyptus that fresh mint doesn’t have. I’m not saying not to use fresh mint but I personally prefer using dried for this Israeli Salad recipe.
 
I also use my homemade Italian Seasoning which is totally not a common ingredient. The reason why I do is because there’s oregano, basil, rosemary, thyme, marjoram, and more. I myself think that this is a great “all-purpose” spice blend to use in many dishes.
 
Some cooks like to peel and seed the cucumber 🥒. I prefer not because both contain fiber and minerals. It helps to improve your cholesterol level and prevent heart disease as well as improving digestion and skin plus lowering blood sugar. High in water and nutrients, it helps to hydrate and is good for weight loss.
 
When I entertain, I make it ahead by mixing all the vegetables together and place it in the refrigerator. When I’m ready to serve it, I simply pour the vinaigrette over, toss to coat, add the cheese, and toss once again. This salad is great for that! 😉
 
Versatile and very tasty, this healthy Israeli Salad can be enjoyed as a light meal along with a fresh baguette 🥖 or a lovely side dish for your grilled food, fish, pork, with sandwiches, burger, etc. With all the fresh produce Mother Nature is giving us this summer, this should be your go-to recipe…
Bon Appétit!🍽
 
Here are more tasty & healthy salad recipes for you to try… 🥗💚
– Salade Niçoise
– Moroccan Potato Salad
– Classic Cobb Salad
– Mixed Tomato Salad
– Cucumber Salad
– Classic Cobb Salad
– Asparagus Summer Salad
– Classic Pasta Salad
and for even more salad recipes 🥗, click on this link… Recipe Category • Salads & Dressings


For ingredient amounts, directions, and more info, visit https://clubfoody.com/cf-recipes/israeli-salad/


Don’t forget to subscribe to our YouTube channel 📽 by clicking on this link… Club Foody YouTube
 

Israeli Salad


Thursday, May 25, 2023

Chiles Rellenos Recipe • A Mexican Favorite! | Club Foody


I’ve been doing this for over 35 years and I’m not about to stop! Since my early 20s’, when ever I go to a restaurant, I have to try something new… it can be an appetizer, a main course, dessert or even a cocktail 🍹. It makes the experience more interesting especially being a foody! Unfortunately, there’s less to choose from after all these years…
 
The same applies when we travel 🛫. Not only is it a delicious way to integrate with the culture but also nice to discover new ingredients, seasonings, and so on. I think of Chicken Tortilla Soup, Pozole, Enchiladas, Elote, Tostadas, Mole, Tamales, Guacamole, Chilaquiles, Tacos al Pastor, Huevos Rancheros, and many more including this one… Chiles Rellenos!
 
Originating in the city of Puebla, this dish is unbelievably tasty 😋! Made with vegetables, chorizo, corn kernels, black beans, cheese, etc. along with other seasonings, and then loaded in poblano peppers, this is a recipe I enjoy all year round but more so during the summer time.
 
I’ve had it a few times in Mexico and not once, was it prepared the same way. It’s like Meatloaf… from one family to another, the recipe always changes a bit. One thing I don’t do with my Chiles Rellenos is to cover the peppers with an egg batter and then fry them. I’d rather omit the batter and simply bake them. They’re still very flavorful but also healthier 💚!
 
When push comes to shove and I don’t have time to make my homemade Chorizo Sausage, I buy it at my supermarket. I simply remove the casings and cut the meat into very small pieces. If there’s ground, it’s even better!
 
Cheese 🧀 is another story. Unless I go to the states to buy my cheese, I never see Queso Fresco nor Cotija cheese here in my neighborhood. My next option is to use sharp white Cheddar Cheese. If you’re luckier than me, you should go with either Mexican cheese. The difference between those two is Cotija cheese has a firmer texture and drier while Queso Fresco is softer and moister. When it comes to the flavor, Queso is very mild whereas Cotija is salty. It’s just a matter of preference.
 
Because I don’t use an egg batter and fry the poblano peppers, I use breadcrumbs to create a bit of crunch and honestly, it’s quite nice! I also cover them with cheese before baking them – my nickname is Minnie Mouse for a reason, lol!
 
When it’s time to serve them, I spread my Salsa Verde on serving plates. I find it’s a great combination. On the other hand, you can also use Fire Roasted Salsa or Pico de Gallo… why not! For the finishing touch, I drizzle on some crema but sour cream works just fine and some chopped cilantro… oh my!
 
Chiles Rellenos is an amazing recipe! Stuffed with a gorgeous chorizo filling, this is a healthy version 💚 to enjoy this traditional Mexican dish! Do what I do and try something new… it’s a fun way to discover different cultures by tasting their food…
Bon Appétit! 🍽
 
Here are several more Mexican inspired recipes for you to enjoy… 😀
– Mexican Rice
– Caesar Salad
– Agua de Jamaica
– Breakfast Burritos
– Pickled Jalapeños
– Grilled Fish Tacos
– Easy Chicken Quesadillas
and for even more International recipes 🌎, click on this link… Recipe Category • International


For ingredient amounts, directions, and much more, visit https://clubfoody.com/cf-recipes/chiles-rellonos/


Don’t forget to subscribe to our YouTube channel 📽 by clicking on this link… Club Foody YouTube
 

Chiles Rellenos


Tuesday, May 23, 2023

Whole Wheat Banana Muffins Recipe | Club Foody


I make muffins on a regular basis as I find them very convenient. You simply grab them and go 🏃‍♀️! In the morning, if there are muffins around the house, that’s what I go for. Unlike cupcakes 🧁, they’re also easy to eat; they can be reheated, carried easily without making a mess with the icing plus also faster to make (no icing required which saves time).
 
I have a long list of favorite muffins like Lemon Poppy Seed, Blueberry, Churro Cinnamon, Caramel Apple, Chocolate, Lemon RaspberryPumpkin & Spice Cream Cheese Muffins, Cranberry, Nutella, Gingerbread, Hawaiian Pineapple & Coconut, Peanut Butter & Jam, and more including this one… Whole Wheat Banana Muffins!
 
These tasty muffins are a great way to start your day off right, when you’re on the run or simply as a snack! They’re so moist with a slight crispy top, flavorful plus they’re wholesome too 💚! With great ingredients, this is an easy recipe you’ll want to make soon…
 
For sweetness, I use maple sugar. I love the taste and it also gives another dimension to these Whole Wheat Banana Muffins. If you don’t have any on hand, substitute palm sugar, brown sugar or even raw sugar. Of course, granulated sugar is another option.
 
After all the dry ingredients are added to the wet ingredients, it’s important to process until “just” combined otherwise you might end up with tough muffins. Just combined means that there won’t be any streaks of flour remaining. Also, don’t forget to clean the sides of the bowl including the bottom as it’s not always well mixed.
 
It’s optional but highly recommended to sprinkle some oats on top of the muffins as well as maple sugar… not a lot, just a little! It makes it prettier plus wraps everything together – think of a cherry on top of a sundae 🍒, right!
 
These tasty and healthy Whole Wheat Banana Muffins keep well for a couple days at room temperature stored in an airtight container or 5 days in the fridge. They can also be kept in the freezer for up to 3 months in a re-sealable plastic bag. This easy recipe has to be in your folder 📒…
Bon Appétit! 🍽
 
Check out these other delicious breakfast/brunch recipes… 🍳🥞🧇
– Angel Eggs on a Cloud
– Pancetta Vegetable Frittata
– Homemade Pancake Mix
– Soufflé Mexican Omelet
– Breakfast Quinoa Cereal with Mixed Berries
– Marbled Chocolate Pecan Banana Bread
– Tropical Sunshine Smoothie
– Ooey-Gooey Cinnamon Buns
and for even more breakfast/brunch recipes, click on this link… Recipe Category • Breakfast & Brunch


For ingredients amount, directions, and much more, visit https://clubfoody.com/cf-recipes/whole-wheat-banana-muffins/


Don’t forget to subscribe to our YouTube channel 📽 by clicking on this link… Club Foody YouTube
 

Whole Wheat Banana Muffins


Thursday, May 18, 2023

Samosas Recipe • Tasty, Savory Pastries! | Club Foody


If you’re a foody, there’s no doubt about it you’ll enjoy Indian cuisine. Building its way into Western countries for decades, its food is now a part of our diet. From appetizers, main courses to desserts including snacks, each bite has a burst of flavor!
 
We’re all familiar now with certain dishes like Chickpea Curry (Chhole), Tikka Masala, Rogan Josh, Mughlai Chicken, Biryani, Lamb Keema, Daal Makhni, Butter Chicken (Murg Makhni), just to name a few but what about when it comes to snacks?
 
Like the main courses, there are a delicious variety of amazing foods such as Papri Chaat, Pani Puri, Kachori, Matar Kulcha, Frankie (I’m not kidding you… I’m so loved what can I say, lol 😂!), Pakoras, Ganthiya, and many more including this incredible one… Samosas!
 
Made with a lovely spiced potato filling stuffed in a cone shaped dough and then quickly fried, these Indian pastries are so flavorful! They are flaky and a great snack to enjoy anytime although they’re great to serve as an appetizer or even as a meal with a nice green salad 🥗 on the side. Whenever you want to savor this simple and yet so tasty fried food, you just have to pair them with Tamarind Sauce… they’re perfect together 👍!
 
My idea of a perfect Samosa is lots of filling, a well-balanced number of spices and just enough dough to hold everything together – many places are all dough and not enough filling… really 🙄! After many years of making it, I can proudly say that mine are quite amazing – it’s not an ego trip… just stating the facts!
 
Like most Indian foods, there’s a lot of spices going into the potato mixture. As most of them are familiar to us, there’s one that is not well known and it’s asafoetida. This ingredient is an important staple in Indian cuisine and hard to find at our supermarkets 🛒 unless you go to your local Indian grocers. Of course, online is another way to purchase some. On the other hand, there’s a way to go around it and it’s by using garlic and onion powder. It won’t be exactly the same but close enough.
 
Another one that shouldn’t be a problem to find but still not a common blend used in our “westernized” diet is ajwain also known as carom seeds. It has a strong aroma and a particular taste. I use it in some of my recipes like Chicken Chapli Kebab, Paneer Pakoras, Missi Roti, Aloo Ajwain, Chutneys, etc.
 
One important aspect of making great Samosas is the frying. Just like Crab Rangoon, we want to keep all the yumminess inside therefore the trick is to double-fry them. First, we start on low heat – 320ºF – which helps the pastries from bursting. After quickly frying them for 2 to 3 minutes, the dough will be somewhat cooked but still pale in color. It’s okay because it makes the dough crunchy and strong for the second-frying.
 
When they’re all done, this is when we increase the oil temperature to 380ºF and return them (in batches) to fry until golden. Not only will it help the color get darker but also make them extra-crispy while keeping all the filling inside.
 
Like I always say – “Homemade is better” – and this Samosas recipe proves it again! Make these favorites in the comfort of your home 🏡 and you’ll be incredibly surprised by how much tastier they are compared to a lot of places in your neighborhood…
Bon Appétit!🍽
 
Here are more great appetizer recipes for you to try… 😀
– Spanakopita
– Sweet Chili Chicken Bites
– Vietnamese Summer Rolls
– Sopa Ajoblanco ~ White Gazpacho
– Middle East Muhammara
– Duxelles Bruschetta
– Pico de Gallo
and for even more snack recipes, click on this link… Recipe Category • Snacks


For ingredient amounts, directions, and much more, visit https://clubfoody.com/cf-recipes/samosas/


Don’t forget to subscribe to our YouTube channel 📽 by clicking on this link… Club Foody YouTube
 

Samosas


Tuesday, May 16, 2023

Tamarind Sauce Recipe • A Must for Samosas | Club Foody


In my early 20s’ when I discovered Indian cuisine, it was love at first bite 🥰! Each dish I tried was loaded with layers of flavor! Some were spicy while others were… well very tasty! I went to a couple restaurants in Montréal and that was it! It was only in my 30s’ when I was living in Toronto that I went back again to that exquisite cuisine and never stopped ever since…
 
I shyly started duplicating some of my favorites at home like Butter ChickenPork VindalooLamb Keema, Rogan Josh, Tandoori Chicken, etc. Each time I tried a new dish at a restaurant, you bet it was just a matter of time before I would roll up my sleeves and give it a shot in the comfort of my kitchen. I gained a lot of confidence juggling those foreign ingredients and spices often having a hard time finding them but as Indian cuisine gained serious popularity in Toronto, it got easier…
 
David and I have many things in common and one of them is food – I’m sure you guessed that one, lol 😉! We both enjoy Indian food and are not afraid to try new dishes. Besides a delicious array of main courses, like any other cuisine, Indian cuisine has it’s own sauces and condiments to pair with their food. There are Chutneys, Paans, Raitas, Curry Sauces, Kasundi, Pakora, and others including this one… Tamarind Sauce!
 
This Indian sauce staple is incredibly easy to make! Sweet and sour with a slight spiciness in the background, this condiment goes so well with samosas or any other fried food! It takes about 20 minutes to cook ⏳ and then another 20 minutes to cool off, letting the sauce thicken while getting to room temperature.
 
Tamarind Sauce is also healthy 💚. There’s no dairy, it’s gluten-free, has very low sodium plus it’s vegetarian and vegan! Another plus about this condiment is it keeps for a long time in the fridge.
 
It’s a very nice recipe to have on hand because besides enjoying it as a dipping sauce for samosas, it can be used as a spread for wraps or as a meat tenderizer. Mix it with other recipes like stir fry, curry dishes, Pad Thai or even Nasi Goreng. What about in scrambled eggs? The possibilities are almost endless… use your foody intuition!
 
Like anything made from scratch, this Tamarind Sauce is sooo tasty 😋! The beauty of making it at home is you are in control of how sweet or sour you like it plus fresher is always better. Don’t be timid and make this gorgeous condiment soon…
Bon Appétit! 🍽
 
Check out these other amazing sauce recipes from around the globe 🌎…
– Hawaiian Style Teriyaki Sauce
– Hollandaise Sauce
– Enchilada Sauce
– Indonesian Peanut Sauce
– Louisiana-Style Rémoulade Sauce
– Classic Marinara Sauce
– Romesco Sauce
– Gyoza Sauce
and for even more condiments recipes 😀, click on this link… Recipe Category • Condiments


For ingredient amounts, directions, and much more, visit https://clubfoody.com/cf-recipes/tamarind-sauce/


Don’t forget to subscribe to our YouTube channel 📽 by clicking on this link… Club Foody YouTube
 

Tamarind Sauce


Saturday, May 13, 2023

How to Revive Stale Bread - Tips & Tricks | Club Foody


This happens to all of us… After buying a baguette 🥖, artisan bread, or French loaf 🍞, either it sits there and we forget to use it or use only half of it. A couple days later, it becomes stale. Don’t throw it away because there’s an easy trick to bring it back and reuse the bread again.
 
How to Revive Stale Bread is easy. From start to finish, it takes only 20 minutes and your bread is back to life! It’ll be crispy on the outside and moist inside. With water – that’s the trick! – and foil then transfer to a low temperature oven which will help to rehydrate the bread without drying it out, you’ll be amazed with the results 😮!
 
The first time I used this trick I got from one of my girlfriends, I was suspicious but had nothing to lose! My baguette was stale… hard like a brick. I could’ve used it as a weapon. What I had to do is to put it in my purse and if someone attacked me, give a good whack with the baguette. Now how interesting would it be if the defender sued me and we ended up going to court – “Yes, your honor 👩‍⚖️, as self-defense, I protected myself by hitting this man with my stale baguette” -, lol 😂!
 
All joking aside though, I was surprised that it worked! How to Revive Stale Bread is a quick fix! The bread has to be used within a few hours 🕓 otherwise you can definitely say goodbye to it… at least, you were able to enjoy some. If there’s mold on it then your bread is good for the garbage… the end!
 
Use common sense when wetting the bread under running water 💧 – it doesn’t matter if it’s cold or lukewarm. If the bread is slightly hard, use a spray bottle instead. As soon as it’s moistened, stop, give a good shake to remove any excess water and wrap it tightly in foil before transferring to the oven. Now if your bread was very hard and you had to run it under water longer to get it moist, I suggest you remove it from the foil after it has baked for 15 minutes, and return it to the oven for an extra 5 minutes so the crust gets crispy.
 
I won’t revive the bread if you want to use it in recipes like Stuffings, making breadcrumbs, in Bread PuddingCroutons, or others because stale bread works better than fresh for these.
 
Although it doesn’t cost that much money 💰 to buy bread, it’s the principle of not throwing something out that can be reused again. This How to Revive Stale Bread trick will bring it to a fresher state! Nice and crunchy on the outside and moist inside, this is a good way to salvage it.
Bon Appétit! 🍽
 
Here are a few tips and tricks that can be quite helpful… 😀
– How to Poach & Shred Chicken the Easy Way
– Secret to Better Freezer Meat Storage
– Bean Sprouts • How to Extend Their Shelf Life
– Blanching Tomatoes for Cooking & Canning – How to
– Keep Moisture Out of Powdered & Granulated Foods
– Speed Up Avocado Ripening – How to
– How to Set a Table; Casual to Formal
and for more handy kitchen tips and tricks 😉, click on this link… Recipe Category • Tips & Tricks
 
Don’t forget to subscribe to our YouTube channel 📽 by clicking on this link… Club Foody YouTube