Thursday, January 27, 2022

Penne alla Vodka Recipe • The Best Tasty Pasta Sauce! | Club Foody


I absolutely loved the ‘80s! The music was awesome, the clothing was elegant and original – (think of the TV show Dallas) – the people were respectful (it’s seems like it’s almost obsolete these days), and the movies were innovative. When it comes to food as well as drinks, they were so delicious and fun! It seemed like each country opened up to the world so everyone could enjoy the flavor of their own culture!
 
What comes to mind is Seven Layer Chip Dip and Pumpernickel Spinach DipPotato Skins, Rillettes or Baked Brie, Pasta SaladBeef Stroganoff, Chicken Kiev, Pizza Rolls and Barbecue Chicken Pizza, Chicken Française as well as Chicken Marbella, Chicken Pot Pie, Veal Tonnato, Sloppy JoesSwedish Meatballs, some Asian dishes like Sushi, Chicken Satay with Peanut Sauce, or a flair of Cajun/Creole cuisine with Blackened Fish, and let’s not forget PestoTiramisu (remember Sleepless in Seattle?), Vol-au-ventsBagels, Plum Torte & Twinkies, Frozen Yogurt, Sex on the Beach, Wine Coolers, Blue Lagoon Cocktail, Poppy Seed and Ranch DressingQuiche, Bran Muffins, and so on… can you tell I’m from that era?
 
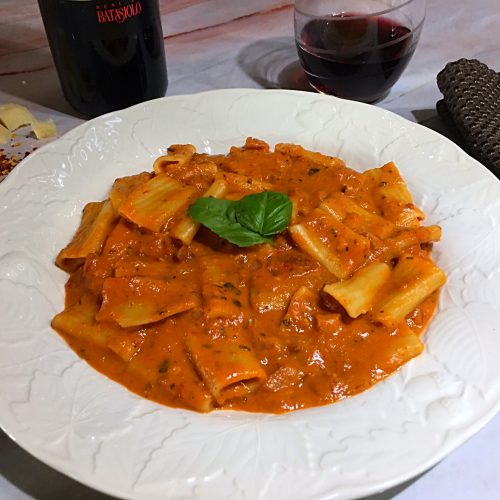
Penne alla Vodka was a favorite from that period as well. I remember ordering it the first time and wondering where all the “vodka” flavor was. After ordering it a few times at restaurants and still not being satisfied with the taste, I decided to duplicate it. I’m so happy I did… This dish is made with pancetta, onions and garlic in a nice tomato sauce along with herbs, spices and vodka (not just a little, but lots of it). For the finishing touch I add some heavy cream and Parmesan cheese. It’s so easy to make but my version is packed with much more flavor!
 
As I mentioned above, I use a lot of Vodka because… well isn’t it supposed to be a creamy “vodka” sauce? Most recipes call for 1 ounce of it… you might as well not add any with such a small amount. When dealing with tomatoes, if you want to taste anything else along with them, you have to increase the volume. After I sauté my vegetables, add some seasoning like my Italian one and red pepper flakes, this is when I pour in the vodka. I reduce it to a third before adding my homemade Marinara Sauce and tomato paste. A little cream is added then pasta, cheese and voilà, Penne alla Vodka is done!
 
Although penne is the preferred choice for this dish, if I have some rigatoni on hand, I’ll go for it. Ziti, helix or paccheri are other delicious options. I always have Grana Padano cheese in the refrigerator but feel free to use Parmesan or Parmigiano-Reggiano cheese instead.
 
If you were old enough to experience the 80s, you know that it was a fabulous decade! With all the amazing dishes we enjoyed, Penne alla Vodka was on the top of almost everyone’s list. Try my version of it and you’ll see how incredibly flavorful mine is without tasting “boozy” but still enjoying the vodka in the background…
Bon Appétit!
 
Here are more tasty pasta recipes for you to try…
– Zucchini Pork Penne
– Lady Athena’s Rockin’ Crab Shell Pasta
– Frankie’s Macaroni Casserole
– Italian Stuffed Pasta Shells
– Pastitsio
– Spaghetti alla Carbonara
and for even more pasta recipes, click on this link… Recipe Category • Pasta & Pizza


For ingredient amounts, directions and much more, visit https://clubfoody.com/cf-recipes/penne-alla-vodka/


Don’t forget to subscribe to our YouTube channel by clicking on this link… Club Foody YouTube
 

Penne alla Vodka


Tuesday, January 25, 2022

Tropical Pineapple Upside Down Cake Recipe | Club Foody


When I was a young lady, I really enjoyed making desserts then I slowed down and now, I serve them only when I have people over for dinner. There was a cake that people loved making back in the 60s, 70s & 80s. To me it was good but after tweaking it a few times, I ended up with an even better version calling it my Tropical Pineapple Upside Down Cake!
 
Yes I know! You’ve probably all had that popular cake before but let me tell you that this improved version is incredible! It tastes almost like a Piña Colada in a dessert form! I still use the “traditional” pineapple rings along with the maraschino cherries but there are a few added ingredients that make this cake sooo good! Curious to find out what they are…
 
I use brown sugar instead of granulated sugar – this alone makes the Tropical Pineapple Upside Down Cake more interesting! To make it moister, buttermilk and sour cream is used as well. Now the two others that make it Piña Colada-ish are dark rum and sweetened shredded coconut. That’s right! With a little of both, it brings this classic dessert to a whole new level of yumminess!
 
To decorate the cake, I use a pineapple ring that I place in the middle and then half slices of pineapple around in a circle before putting maraschino cherries in the middle of each. On the sides of the springform pan, I also place half sliced pineapple rings, upside down. When I pour the batter over the fruits, I put more cherries in the middle of each side ring before gently spreading the batter towards them to secure the cherries on the side. This is how I like to make mine but feel free to decorate yours the way you prefer.
 
This Tropical Pineapple Upside Down Cake is so flavorful! It’s is a delicious twist on an old classic. Easy to make and so colorful, this is a dessert you can serve all year round…
Bon Appétit!
 
Here are more scrumptious cake recipes for you to try…
– Holiday Fruitcake
– Blueberry Cake
– Black Forest Cake
– Coffee Cake
– Cranberry Orange Bundt Cake
– Cream Cheese Carrot Cake
and for even more dessert recipes, click on this link… Recipe Category • Dessert


For ingredient amounts, directions and much more, visit https://clubfoody.com/cf-recipes/tropical-pineapple-upside-down-cake/


Don’t forget to subscribe to our YouTube channel by clicking on this link… Club Foody YouTube
 

Tropical Pineapple Upside Down Cake


Thursday, January 20, 2022

Fisherman's Pie Recipe • A Flavorful Fish Casserole! | Club Foody


Casseroles are the ultimate comfort food. There are so many nice recipes to choose from like my Tuna CasseroleShepherd’s PieTurkey TetrazziniSouthwest Beef CasseroleLamb KeemaHamburger Helper, and many more. There is one that I enjoy making especially during the cold months and it’s my Fisherman’s Pie!
 
This casserole is so easy to make plus the flavors are amazing! It’s a delicious dish to serve your family and a great way to enjoy fish and seafood. There’s nothing elegant about it but it sure is a lovely recipe to add to your folder! With creamy mashed potatoes, vegetables, herbs and spices, this is what I call a “yummy in the tummy” dish!
 
Poaching is one of the steps used for this Fisherman’s Pie recipe. I use whole milk for that and it makes such a big difference. You must wonder why I’m poaching in milk versus broth or plain water. Whole milk contains fat therefore it enhances the flavor of the fillets and adds creaminess to the fish. To amplify both taste and texture, use half-and-half instead.
 
Now depending on the thickness, poaching fillets gently on medium-low doesn’t take that long… 3 minutes is usually what I go for. If they’re poached too long, they might fall apart and that’s not the result we’re looking for. We want to be able to take the fillets whole and then shred them with forks after. When it comes to shrimp, a minute is sufficient otherwise they’ll turn rubbery.
 
After poaching the fish and the shrimp in the milk, don’t throw it out and reserve it. There will be a skin formed due to cooking; skim it off and simply discard it. The total amount of the reserved milk should be around 3 cups and more than likely, you’ll be using about 2 ½ to 2 ¾ cups. After adding the cornstarch, if the texture is way too thick, you can always add a little bit more.
 
Last year I received a potato ricer as a gift… okay a shared gift for both David and I! This is the kitchen tool I use for my potatoes in this recipe and it gives such a nice texture. Prior to this “gift”, I used a potato masher and although I was doing a pretty good job, the potato ricer is much better giving a smoother texture. If you own a food mill, this is another option.
 
Casseroles are a favorite among home cooks and this Fisherman’s Pie is another one to add to your folder. The combination of ingredients goes so well together making it a delicious weeknight dish to serve to your family.
Bon Appétit!
 
Here are more tasty fish & seafood recipes for you to try…
– Mediterranean Fish Fillet with Tapenade
– Bouillabaisse à la Marseillaise
– Shrimp Martini with Robuchon Mashed Potatoes
– Sole Meunière
– Sautéed Scallops with Beurre Blanc
– Fish in Coconut Milk
and for even more fish & seafood recipes, click on this link… Recipe Category • Fish & Seafood


For ingredient amounts, directions and much more, visit https://clubfoody.com/cf-recipes/fishermans-pie/


Don’t forget to subscribe to our YouTube channel by clicking on this link… Club Foody YouTube
 

Fisherman's Pie


Tuesday, January 18, 2022

Brioche Bread Recipe • Buttery & Delicious French Bread! | Club Foody


Freshly made pasta, creamy delicious sauces and nice warm bread all have the same common denominator… they are my ultimate weaknesses! Even if I’m not hungry, something in my brain goes off and that’s it, I want some!
 
When it comes to bread, homemade is the best! There’s nothing better than a nice loaf baking in the oven… the aroma floating through the air is incredible! After it comes out all puffy and warm, it takes all my willpower to not start slicing half of the loaf and spreading some butter on it. Although it’s mentally challenging (in a delicious way), I love making bread from scratch like Baguettes, Roti, Hot Dog Buns, Bannock, Focaccia, Pita, Bagels, Pandoro, Dinner Rolls, etc.
 
There’s a Jewish bread that I’ve been making for years called Challah as well as its French counterpart which is Brioche Bread! The taste of it is absolutely amazing! With a nice buttery flavor, this rich bread is incredible! Surprisingly, making this bread is easier than you think – if I can do it so can you!
 
What’s the difference between Brioche Bread and Challah? They are both sweet but the French one is made with butter and lots of it (are you shocked?) while the other is made with oil. They are both perfect for French Toast, sandwiches, buns for burgers or simply to serve along with your meal. They are great to make for the Holidays as well as during Easter.
 
Made with butter and eggs but mostly butter just like a flaky croissant, it’s important that your ingredients are at room temperature especially the butter. When I filmed the video in the middle of winter, I should’ve left it out a little longer on the counter. If your butter is still a little too hard like mine, simply put the bowl in the microwave for a few seconds (10 seconds) to soften it but make sure to not overdo it as we want some texture from it.
 
When the dough is made and we form a ball with it (the texture will feel like a slinky toy in “dough form”), we’ll be transferring it to a bowl “lightly” greased. There’s enough butter in it to not stick but by precaution, a little flavorless oil like grapeseed to coat the bowl won’t hurt.
 
After the rise, punching it and forming a ball with it, I cover and transfer the dough to the fridge for 8 to 24 hours. Many let it chill for 2 hours. I find it works better when the dough is left in the fridge longer. When taking it out, it will be hard and that’s okay, just let it get to room temperature until it softens. Now if you want to form balls or braid it like I showed you for the Challah, weigh it while it’s still hard… it makes the task easier.
 
There will also be a thin crust on it. I did the test by covering the dough with plastic wrap and then a clean dish towel as well as no cling film and only a dish towel. There’s no drastic difference between the two.
 
The proofing time is usually a couple hours or until it doubles in size. In the video, I totally forgot about my bread because I was doing other things and I let it proof longer (it tripled in size), ending up with a very big loaf… actually a humongous Brioche Bread! Visually it was a little deformed but it tasted lovely!
 
Enriched with butter and eggs, this Brioche Bread is so tasty! Unless you know a boulangerie who makes them like the way it should be, you’ll be amazed how delicious it actually is! Save some money and enjoy this lovely buttery bread at home.
Bon Appétit!
 
Here are more delicious bread recipes for you to try…
– Cheesy Breadsticks
– Arepas with Beef Brisket
– Mediterranean Olive Bread
– Mexican Cornbread
– Popovers
– Cheddar Biscuits
and for even more bread recipes, click on this link… Recipe Category • Bread


For ingredient amounts, directions and much more, visit https://clubfoody.com/cf-recipes/brioche-bread/


Don’t forget to subscribe to our YouTube channel by clicking on this link… Club Foody YouTube
 

Brioche Bread


Saturday, January 15, 2022

Pears • How to Core - Tips & Tricks | Club Foody


Every season, Mother Nature brings us a wide variety of delicious produce. During spring there’s asparagusceleriac, fiddleheads, radicchio, spinach, radishes and others before summer comes along with berries then peacheszucchini, apricots, eggplants, plums, etc. Slowly fall arrives and gives more gorgeous crops like applespumpkincranberriesBrussels sprouts, pears, leeks, and more. When winter finally gets here, there is another bunch of lovely produce including turnipsbeetscabbagegarlicpotatoescarrots, and so on.
 
When it comes to pears, I can’t get enough of them! They are so juicy and perfect to use in salads (Pear Pomegranate Blue Cheese Salad), smoothies, jams, as an ingredient for pork, duck or lamb, in sandwiches (Grilled Brie, Ham & Pear Sandwich), for breakfast, making sauces, and obviously desserts (Poires Belle Hélène, Diplomate, or Poached Pears with Caramel Sauce).
 
Like apples, the seeds have to be removed. In this Pears • How to Core episode, I’ll show you the simplest way to remove the seeds without cutting the fruit in half. What you need is a melon baller, that’s all! When poaching the fruit, it cooks better without the core plus I don’t think you want your guests eating the seeds.
 
Pears • How to Core is a good method to know especially when you want to keep the fruit whole. Many cooks out there like to cut it in half, remove the seeds, poach the fruit then put each half together. Why? It takes next to no time to do it plus the appearance is nicer than two halves leaning against each other.
 
For a beautiful presentation, use this easy Pears • How to Core method next time you want to serve Poires Belle Hélène or my other recipe which is Poached Pears with Caramel Sauce. Also, try to keep the stem on, it looks more… foody!
Bon Appétit!
 
Check out these other great handy kitchen tips and tricks…
– How to Prepare an Avocado
– Prepping Lemongrass – How to
– How to Cut a Mango
– Seed a Pomegranate without the Mess
– How to Trim, Cut & Clean Leeks
– Kiwifruits – How to Peel Quickly
– Bean Sprouts • How to Extend Their Shelf Life
and for more handy kitchen tips and tricks, click on this link… Recipe Category • Tips & Tricks
 
Don’t forget to subscribe to our YouTube channel by clicking on this link… Club Foody YouTube


Thursday, January 13, 2022

Chicken Paprikash Recipe • A Flavorful Hungarian Dish! | Club Foody


I’ve been using a wide range of common and exotic spices & herbs for my recipes. I can’t imagine cooking without them. Every time I go shopping to a specialty store, I have to take a look in the spice/herb section. Do I have plenty in my cupboard already? To some, the answer would be yes… to me… I never have enough…
 
From Za’atar, Sumac, Berbere, Ajwain Seeds, Saffron, Anardana, Nigella Seeds, Piment d’Espelette, Juniper Berries, Dukkah, Kaffir Lime Leaves, etc. to the usual suspects like Cumin, Italian Seasoning, Garlic Salt, Herbes de Provence, Oregano, Basil Leaves, Mixed Spices • Épices Mélangées (Épices Mélangées), Thyme leaves, and more! Another one that I really enjoy cooking with is Paprika. I’m sure you could guess that I have them all; hot, smoked and sweet! There’s a popular Hungarian dish I make often that uses this kind of spice and it’s Chicken Paprikash!
 
If you never had it before and like the taste of paprika, this is the dish for you! Not really spicy but definitely with some zip to it, this is a great and easy recipe to serve your family. Simmered gently, this comforting chicken stew is packed with flavor!
 
My Chicken Paprikash might be slightly different than others… I use all 3 types of Paprika. Each gives its own flavor to this delicious dish. I honestly don’t know if any Hungarian cooks use all of them but I really enjoy the combination. If you prefer using just one, sweet is probably the most common one used for this recipe. Just a quick note… if your paprika is too old, it will be tasteless so make sure the spice is nice and fresh to enjoy the true flavor of this dish!
 
To make this stew-like Hungarian dish, I use boneless, skinless chicken thighs. Chicken breasts can be substituted but there will be some lack of flavor due to the leaner white meat. Thighs are a fattier cut therefore are more flavorful than breasts. Others parts can also be used such as drumsticks. If you have a whole chicken hanging around, cut them into pieces and use it all.
 
This Chicken Paprikash is simple and yet so satisfying! Spooned over spätzle or egg noodles, this Hungarian peasant dish is a great one to serve on weeknights along with crusty bread… you’ll absolutely need that to soak up the yummy sauce! It freezes well for up to 3 months.
Bon Appétit!
 
Here are more scrumptious International recipes for you to try…
– Beef Stroganoff
– Pork Stew with Meatballs ~ Ragoût de Boulettes & Pattes de Cochon
– General Tso’s Chicken
– Paella de Marisco
– Pastitsio
– Cassoulet
and for even more chicken recipes, click on this link… Recipe Category • Poultry


For ingredient amounts, directions and much more, visi https://clubfoody.com/cf-recipes/chicken-paprikash/


Don’t forget to subscribe to our YouTube channel by clicking on this link… Club Foody YouTube
 

Chicken Paprikash