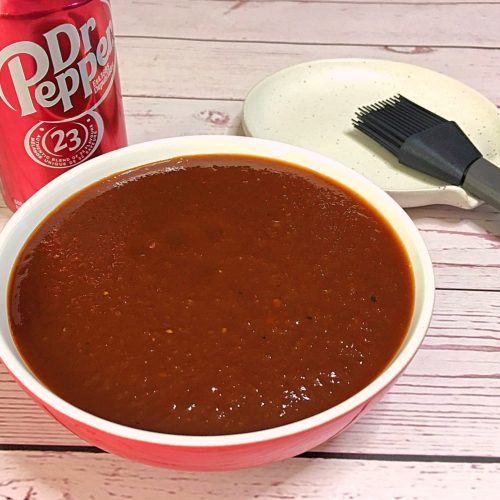
The end of April is a busy one for me because I’m getting ready for BBQ season 🔥! I make sausages like Merguez and Garlic, condiments such as Horseradish, Sweet Relish, Pickled Jalapeño and German Mustard, plus I ensure that my spice jars are filled. I also make sure all my BBQ sauces are done 🥣. There’s Caribbean BBQ Sauce, Mustard BBQ Sauce, Kansas City, Tex-Mex BBQ Sauce, Jack Daniels BBQ Sauce, Pit Master BBQ Sauce, Hawaiian Style Teriyaki Sauce, and many others including this one… Dr Pepper BBQ Sauce! This homemade recipe is amazing! It’s sweet, tangy, smoky and spicy all at once! With its hints of cherry 🍒, vanilla and citrus along with a noticeable peppery background, this flavorful soda drink gives a delicious complexity to the sauce. Besides that, it’s an easy recipe and takes just 45 minutes to make. Onions, garlic and Dr Pepper are combined in a saucepan and simmered for a short time enough to make the onions translucent. The remaining ingredients are added before bringing the mixture to a boil. It’s then reduced and simmered gently for 30 minutes ⏰. It’s pretty straightforward, don’t you think. To make the Dr Pepper BBQ Sauce smooth, I use an immersion blender and process until there are no lumps. If you’re using a regular blender, make sure to place a kitchen towel on top of the lid and hold it down tight so the pressure doesn’t make the lid fly off, causing serious burns 🤕. After this is done and allowed to get to room temperature, the sauce is poured into a container and transferred to the fridge. For maximum flavor, I highly suggest you let your BBQ sauce rest in the fridge for a couple days 📆 before using it. It gives time for the flavors to mingle… Another thing I like to do prior to grilling is to pour Dr Pepper soda (not the sauce) over my meat 🥩 and let it soak for 30 minutes. The carbonation from the soda will not only tenderize your protein but also add flavor to it. Half an hour later, simply proceed with your recipe. Brush on ribs, beef or chicken 🐓, this amazing Dr Pepper BBQ Sauce is perfect for your grilled food. It can also be used as a dipping sauce for your fries or onion rings as well as spooning it over Sloppy Joes, pulled pork sandwiches or Meatloaf. It’s certainly a must have for this coming season! Bon Appétit! 🍽 Here are more delicious condiment recipes for you to try… 😀 – Pomegranate Molasses – Spicy Red Pepper Jelly – Mango Chutney – BBQ Sauce for Chicken – Bread & Butter Pickles – Sweet Chili Sauce – Fire Roasted Salsa – Bourbon Onion Jam – Marchand de Vin and for even more condiment recipes 🥫, click on this link… Recipe Category • Condiments
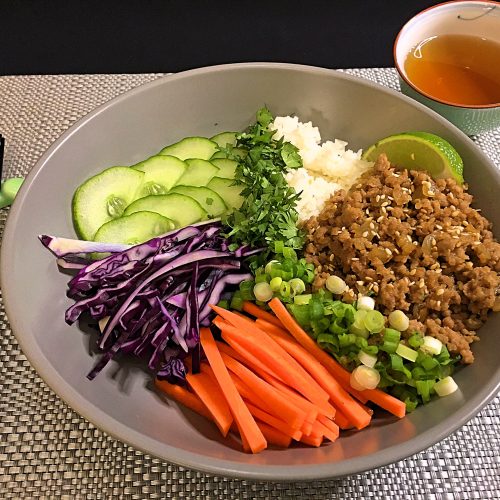
By the time I get to the end of April, my recipes start being lighter! I don’t feel like eating casseroles 🍲 or any heavy meals. I want something light such as Ahi Tuna Poke Bowl, Korean Beef Lettuce Wraps, Japanese Chicken Soba Noodles, etc. Another one that we really enjoy is my Asian Pork Rice Bowl! Super easy to make 👩🍳👨🍳, this recipe is loaded with yumminess! With ground pork cooked in a flavorful sauce and then spooned in a bowl along with rice and a nice assortment of fresh vegetables, this is a satisfying meal to enjoy! The pork mixture itself is so tasty! There’s onions, garlic 🧄 and ginger along with other great ingredients such as brown sugar, hoisin sauce, soy sauce and sweet chili sauce which you can make from scratch! As the title refers, there’s rice 🍚 in it. I use jasmine instead of basmati. I find it has a nice subtle floral fragrance and is slightly sweet too! Basmati on the other hand, has more of a nutty flavor. Learn how to cook jasmine by clicking on this link… Jasmine Rice • How to Cook Perfectly To me, this Asian Pork Rice Bowl falls into the “healthy” 💚 category! There’s julienned carrots, English cucumber, purple cabbage and green onions. Sesame seeds are also added which is high in protein, fiber plus it has nutrients and healthy fats! The combination of ingredients gives this bowl a delicious balance of flavor! These are ingredients that you can easily find at your supermarket. If you want, you can use other preferred veggies like bell peppers, kimchi, cherry tomatoes, and so on. It’s also a fun recipe to make for kids 👧👱♂️! This Asian Pork Rice Bowl is a gorgeous meal to enjoy this spring! It’s light, healthy and easy to prep plus can be ready in 30 minutes ⏰! It’s a lovely recipe to serve either for lunch or dinner! Bon Appétit! 🍽 Check out these other delicious pork recipes… 😀 – Mushroom Quiche – Moo Shu Pork Tortillas – Pork Chops with Pineapple BBQ Sauce – Pepperoni Pizza – Kansas City Style Pork Ribs – Croquetas de Jamón • Ham Croquettes – Pierogi Casserole – Chiles Rellenos – Ricotta Spinach & Sausage Pasta and for even more pork recipes 🐖, click on this link… Recipe Category • Pork
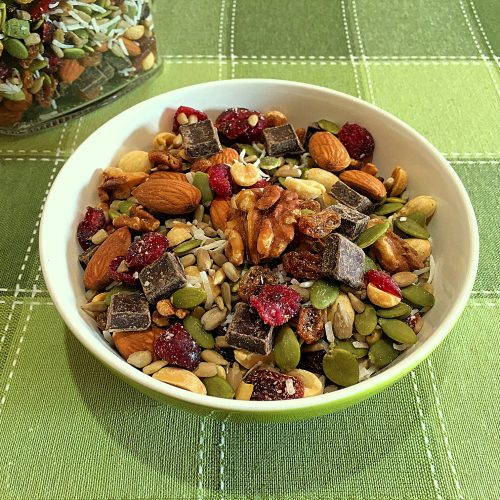
It’s 3 o’clock in the afternoon and suddenly, my tummy is growling! Of course, we’ll be reaching out for something to munch on. Ideally, a healthy snack is the way to go. Today is Earth Day 🌎 and what better way to showcase some of them. There’s a long list of hearty snacks on CF website 💻. I think of Powerhouse Cookies, Seaweed Wraps, Beet Hummus, Salsa, Granola Bars, Sesame Snaps, Baba Ghanoush, Pistachio & Cranberry Oat Squares, Labneh, Energy Berry Bites, Olive Tapenade, Maple Glazed Walnuts, Raincoast Crisps, Guacamole, etc. Another one that is so amazing and we love having around is my Trail Mix! This is a “feel good” snack recipe! With nuts, dried fruits, seeds and dark chocolate 🍫 along with a touch of spice, this is a lovely mixture to nibble on. It’s satisfying and filling as well. Nuts, seeds and dried fruits offer great health benefits 💚 like fiber, proteins, vitamins and minerals, plus healthy fats. These are incredible food items to enjoy regularly. Besides that, adding spices to this yummy snack bring other beneficial effects. In the video, I chose almonds and walnuts along with dry roasted peanuts 🥜 but you can opt for others such as pecans, hazelnuts, cashews, pistachios, macadamias, or Brazil nuts. Whichever you decide on, quickly toast them in the oven. They will become crispier and their flavor will be enhanced. When it comes to seeds, I went with pumpkin and sunflower 🌻 but I like switching them around. It can be chia, sesame, flax, watermelon or hemp seeds. There’s nothing written in stone when it comes to the ingredients in a Trail Mix so use your favorite ones. Dried fruits are another succulent item to add to the mix. There are so many to choose from but the most common ones are apricots, cranberries, dates, blueberries, goji, raisins, pineapple, cherries, mangoes 🥭, prunes, and currants. I like to add “fun food” in the mixture. Either it’s dark chocolate pieces (not milk chocolate), popcorn, or coconut flakes 🥥. Some like adding M&M’s, pretzels, mini marshmallows, cereals such as Cheerios or Chex, apple or banana chips. I prefer leaving them out but build yours the way you want. Now, here comes the spices… Himalayan salt 🧂 is rich in minerals and electrolytes which are sodium, magnesium, potassium and calcium. Ground cinnamon has antioxidant and anti-inflammatory properties that are also found in cayenne pepper. Additionally, cayenne improves circulation and digestion, relieves pain, has anticancer properties plus it’s a good source of vitamin A, C, and E. Loaded with tasty and wholesome 🥰 ingredients, this delicious Trail Mix is the perfect snack to enjoy anytime! It’s easy to make and sure to become a family favorite! Bon Appétit! 🍽 Here aremore healthy recipes for you to enjoy… 😀 – Green Smoothie – Whipped Feta Cream Cheese Dip – Garlic Soup – Cod in Puttanesca Sauce – Roasted Squash Seeds – Moroccan Zaalouk – Caprese Skewers – Quinoa Summer Salad – Korean Beef Lettuce Wraps and for even more snack recipes 🥜, click on this link… Recipe Category • Snacks
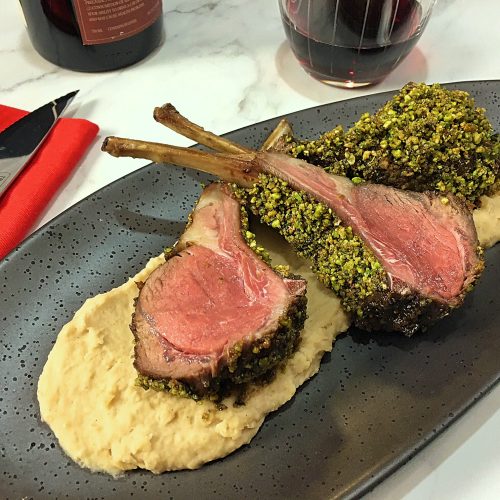
When my brother and I were children, my parents prepared food using a wide variety of proteins so we don’t turn into “picky eaters”. We had the usual which were chicken, turkey, beef, pork, as well as the ones from the sea 🦞 and fresh water. After I moved out on my own in my early 20s’, my adventurous culinary side went wild. I’ve been trying meat that we (my brother is the same as me) didn’t have at home like duck 🦆, lamb, ostrich, bison, venison, rabbit, alligator, etc. One that can be a little gamey at times is lamb. With its distinct flavor, many are turned off 😖 from it. David is not a big fan of lamb therefore I always make sure to buy the protein from North America (more info below) and also bring some serious flavor to the dish. I’ve posted over a dozen lamb recipes on the website such as Bobotie, Greek Dolmades with Avgolemono Sauce, Cassoulet, Mediterranean Leg of Lamb, African Lamb Tagine, Pastitsio, Lancashire Hotpot, Lamb Ragù, and many others. Here’s another one to add to this yummy list 📑… Pistachio Crusted Rack of Lamb! This elegant recipe is perfect when entertaining! It’s colorful 🌈, delicious, makes a beautiful presentation, and above all, it’s quick and easy! It takes 30 minutes from start to finish unless the racks are prepared ahead and only need to be roasted which makes it even faster, ideal when guests are over. This Pistachio Crusted Rack of Lamb is gorgeous! To save time, I buy the racks already frenched. After searing them, they’re transferred to the oven and roasted for 8 minutes ⏰. After that, Pomegranate Molasses is brushed on then the racks are coated in the pistachio crust and back in the oven. When it comes to the pistachio crust, it’s important that it’s processed until very fine so it can adhere better. In the video 🎥, I didn’t and regret it! To make the mixture moist, a little oil is added to it, enough to resemble damp sand. After they’re coated, the racks go back to the oven for 5 to 8 ⏳ minutes or until the internal temperature reaches 135ºF for medium-rare although lamb is normally served more on the “pinky” side with an internal temperature of 125ºF. David and I prefer medium-rare but cook them to your liking. Let’s talk about the difference between lamb 🐏 from Australia versus North America… It’s about feeding. The Aussie ones are raised and grass-fed on open pasture, giving that “gamey” taste. The North American producers are still raising them on grass but finish them on grain which makes them milder. Also, the Australian ones are leaner in comparison to ours. As this protein becomes more popular here in Canada and the United States, this Pistachio Crusted Rack of Lamb is perfect to serve for any special occasion! With its colorful and tasty crust, this is certainly a lovely recipe to add to your folder 📁! Bon Appétit! 🍽 Here are more elegant recipes for you to try… 😀 – Duck Breast with Blood Orange Sauce – Scallops with Smoky Cream Corn Sauce – Torta Pasqualina • Easter Pie – Moroccan Kefta Tajine – Stuffed Pork Tenderloin with Spinach Ham & Cheese – Lobster Newberg – Red Wine Braised Short Ribs – Sole Meunière – Steak Oscar and for even more lamb recipes 🐏, click on this link… Recipe Category • Lamb
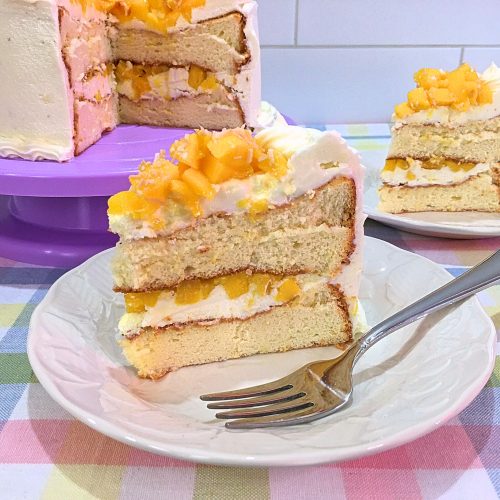
Easter is right around the corner. Besides Christmas 🎄, this is my second favorite Holiday! It’s the turning point from cold to warmer weather… finally! Other reasons are its significance, its pretty pastel colors and of course, spending some family time especially when it comes to Easter egg hunting for the little ones… With bunnies and little chicks 🐣, this is a great occasion to gather with loved ones and make a nice dinner. If you’re hosting, you’ll end up making a scrumptious dessert. It can be a Carrot Cake, Lemon Meyer Cake, Cheesecake, Lavender Cupcakes, Lemon Meringue Pie, Hummingbird Cake, and so on… Another one that originated from the Philippines 🌏 and is incredibly delicious is Mango Cake! Made with a nice sponge cake along with a mango filling and wrapped up with a beautiful creamy Cream Cheese Frosting, this is the ideal dessert for Easter! It’s not a complicated recipe but it takes time ⏰ particularly for the making of the cake. It’s technical, that’s all! To get that light, fluffy and airy texture, you have to follow each step and not rush anything. Just like chiffon and angel food cakes, sponge is delicate and needs some attention to details… First, the flour has to be sifted and measured 📏. I like using self-rising flour because of the added leavening agent but many will use cake flour instead with its low protein content and milled into a superfine consistency. However, when I add sifted self-rising flour to my egg yolk mixture, I sift it once again. Doing it twice adds more air to the flour which means the texture of the cake 🍰 will be lighter and fluffier. If using cake flour, you don’t have to sift it twice. Before integrating the flour into the yolks, they have to be whisked properly. After adding granulated sugar and toasted coconut flakes 🥥, the yolk mixture has to become thick and fluffy, its color turning to a light yellow, and when lifting the whisk from the bowl, the batter falls back in a ribbon. After they’re done, the sifted flour is added by batches through the sifter (no need if using cake flour), mixing well between each addition. By the time the flour is all in, the batter will get very thick therefore, add a little milk 🥛, just enough to finish mixing the batter properly. Don’t go beyond ½ tablespoon. Now the egg whites… The whites 🥚 as well as cream of tartar are added to the bowl of a stand mixer and processed until soft peaks form before adding the remaining sugar. Why adding cream of tartar? It stabilizes the whipped egg whites, keeping the air bubbles stable and also helps the cake to rise. When the granulated sugar is all in, we continue whipping the egg white mixture until stiff peaks form before adding it, by batches, to the batter (egg yolk mixture). Take your time to fold 🥄 them in gently until nicely incorporated – don’t knock out the air bubbles! We’re now ready to transfer the batter into cake pans BUT that too, is different from regular cakes. The bottoms of the cake pans are lined with parchment paper rounds that are lightly greased 🧈 while the sides are NOT! Why’s that? The ungreased sides help the batter to rise and for the cake to get structure. If the sides are greased, then the batter will slide down and the cake will collapse. It needs to grip onto the sides in order to achieve the tall, fluffy cake 💭 we’re looking for! When placing the parchment rounds, make sure to smooth them out to prevent the batter from getting under it. If you’re not familiar on how to make them, click on this link 💻 for a quick tutorial… Parchment Paper Rounds for Cakes Carefully, transfer the cake pans onto a wire rack after being baked. Let them cool partially for 20 minutes ⏳ before inverting them onto the wire rack. The reason why we flip the cake pans is to maintain their height. By cooling them upside down, the gravity prevents the center from sinking. This also applies to chiffon and angel food cakes. While they’re cooling, make the Cream Cheese Frosting. It’s exactly the same recipe except, for this Mango Cake application, pure coconut extract is used instead of vanilla extract. If using other cake flavors 🍊, you might want to switch for a different extract. Next step is to assemble the cake… If the cakes have to be leveled out, use a serrated knife 🔪. After spreading out about ½ cup of the frosting or enough to cover, half of the diced mangoes is spooned over in a single layer. The second cake is placed on top before entirely covering the cake with the frosting, keeping some to make the rosettes. David is the expert when it comes to piping. The rosettes are piped all around the outside edge on top of the cake. He’s using a 1M but any other large star ⭐ piping tip will do. If you like, pipe some frosting around the cake at the bottom with the same tip… it makes a nice presentation. The rest of the mangoes 🥭 are neatly spooned into the center, making sure to keep the rosettes intact. For the finishing touch, some toasted coconut flakes are sprinkled over the fruit and not on top of the rosettes. If you’re not to sure how to prep mango, click here… How to Cut a Mango Easter 🐰 is bright, with gorgeous pastel colors. Although I make this dessert throughout the year, this Mango Cake fits perfectly for the occasion! Don’t let the steps stop you from making this scrumptious dessert… it’s so worth it! Bon Appétit! 🍽 Check out these other scrumptious cake recipes… 😀 – Chocolate Beet Cake – Tropical Pineapple Upside Down Cake – Red Velvet Cake – Cranberry Orange Bundt Cake – Black Forest Cake – Orange Flan – Lamington Cake – Blueberry Cake – Coffee Cake and for even more dessert recipes 🍰🍩, click on this link… Recipe Category • Dessert