Thursday, May 30, 2024

English Muffins Recipe • Light, Fluffy & Delicious! | Club Foody


Ask me what my ultimate weakness is and I’ll tell you it’s bread 🍞🥖… okay, maybe a couple others but bread is definitely among them! The smell of freshly baked bread simply triggers my appetite. When making it at home, it’s even worse because it’s so fresh!
 
In the morning, there is a wide variety to choose from like Banana Bread, Croissant 🥐, Brioche, Monkey Bread, Zucchini Bread, Pain au Chocolat, Bagel, Apple Cinnamon Bread, and the list goes on! Another one that is quite popular for breakfast and brunch is English Muffins!
 
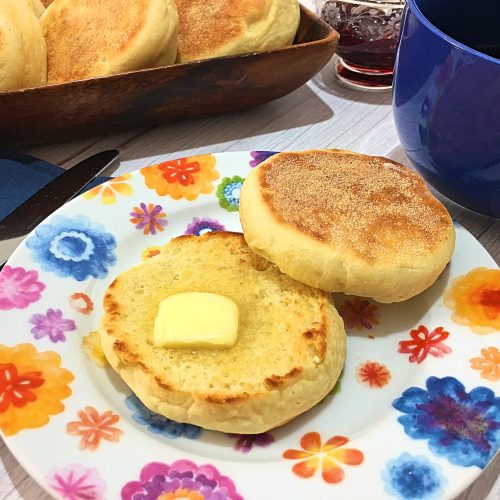
These little guys are delicious and fabulous when making them from scratch! While the store-bought ones are heavy and dense, these homemade ones are light, fluffy and incredibly tasty 😋! Their texture is soft and slightly chewy plus they’re easy to make with amazing results!
 
You don’t need a degree 🎓 from Le Cordon Blue or the Institute of Culinary Education (ICE) to make these incredible breakfast delights! What you need is time and a cookie cutter… that’s all! I say “time” because to achieve great flavor and texture, it’s ideal to let the dough rest in the fridge for at least 8 hours but preferably overnight.
 
When making the dough, it will become pretty sticky and that is exactly what it’s supposed to be. The perfect kitchen tool for the task is a stand mixer as it will be hard to handle. Contrary to other bread recipes, English Muffins are “special” and the paddle attachment is used instead of the dough hook.
 
When mixing flour and salt 🧂, there’s no need to sift but whisking the two ingredients for a minute or two will give a lighter outcome. For this application, I like using unbleached all-purpose flour. It gives a light chewiness to these little guys. If using bread flour, the texture will be chewier.
 
After rising in a very well-oiled bowl for a couple of hours or until it doubles in size, the bowl is covered with plastic wrap and the dough is transferred to the fridge. During that time, it will puff up and the flavor will develop as well. Here’s what happened when filming 🎥 this featured recipe…
 
I had an insane schedule and although I’ve been making them for years, I had no energy to proceed with the recipe the next day. I took a chance and left the covered dough in the fridge for an extra day. Two days later, I continued filming, hoping 🤞 the recipe wasn’t ruined. To my surprise, they were astonishingly tasty and not dry at all!
 
When taking the dough out (a day or two later) and dropping it onto a well-floured work surface, it’s important to gently spread it out with floured hands down to ½-inch thick. The dough will retract therefore let the gluten relax for a couple minutes ⏳ before going back at it. It’s not recommended to use a rolling pin because it will knock the air out.
 
Although semolina can be used, the true signature of these muffins is cornmeal. I sprinkle a large baking sheet lined with a silicone mat or parchment paper with cornmeal and spread it out evenly. After cutting my dough with a 3-inch cookie cutter, each round is transferred to the prepared baking sheet, sprinkle the tops with more cornmeal, cover with a clean dish towel and proof for 30 minutes ⏰.
 
The best way to cook 👩‍🍳👨‍🍳 these little guys is either in a cast-iron pan or a griddle. Make sure the pan (or griddle) is very hot before starting. Sprinkle more cornmeal, place 3 or 4 muffins, cover with a lid and reduce the heat to medium-low. It should take about 8 to 10 minutes before getting that gorgeous golden-brown color. Flip and cook until the internal temperature reaches 200ºF.
 
While cooling off on a wire rack, do another batch. You can push away the “used” cornmeal on the side but I prefer getting rid of it so it doesn’t burn and trigger my fire alarm 🔥 (it’s very finicky). I repeat the same process, working in batches; lightly sprinkle in some cornmeal, place 3 to 4 muffins, cover and cook.
 
Baked muffins can be stored in an airtight container for up to 4 days. They also freeze very well for up to 2 months. What I do is to wrap them individually with wax paper and place them in a large re-sealable plastic bag or container. When it’s time to serve, I thaw what I need either on the counter or in the microwave.
 
These homemade English Muffins are outstanding! Fluffier, lighter and tastier than the ones from the store, these staple breakfast items should be on your “to do” list. With their “nooks and crannies”, these airy little rounds are perfect to spread with butterjam, honey 🍯 or use them for eggs benny, breakfast egg sandwiches, and so on…
Bon Appétit! 🍽
 
Here are more delicious bread recipes for you to try… 😀
– Pumpkin Chai Bread
– Challah
– Ooey-Gooey Cinnamon Buns
– Scones
– Pineapple Banana Bread with Coconut & Macadamia
– Jalapeño Cheese Bagels
– Saffron Buns
and for even more bread recipes 🍞🥐🥯, click on this link… Recipe Category • Bread & More


For ingredient amounts, directions, and much more, visit  https://clubfoody.com/cf-recipes/english-muffins/


Don’t forget to subscribe to our YouTube channel 📽 by clicking on this link… Club Foody YouTube
 

English Muffins


Tuesday, May 28, 2024

Carne Asada Fries Recipe • A San Diego Favorite! | Club Foody


After spending 6 weeks in the Palm Springs area, many times we like to go down to San Diego and visit family and friends. From there, we slowly drive up, stopping along the way to see more friends in Dana Point, Los Angeles, San Francisco 🌉, Seattle, etc., until we cross the US-Canada border. Then we know our vacation is over.
 
During one of our trips 🚙 to San Diego, we came across a very nice dish. As it’s right next to the Mexican border, I thought it was a Mexican recipe until I was informed that it actually originated right in San Diego. It’s Carne Asada Fries!
 
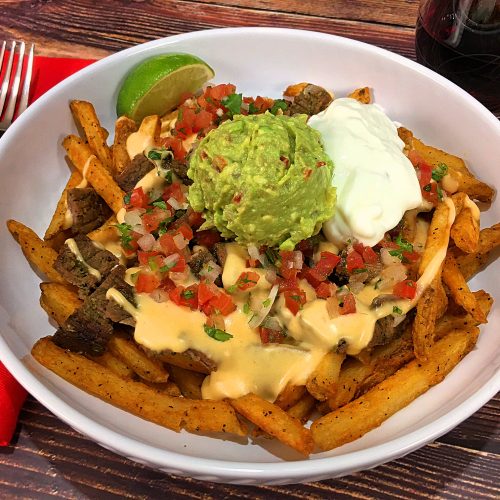
This is an amazing meal which consists of marinated grilled beef 🐄 cut into small bite sized pieces and sprinkled over French fries before more toppings are added; cotija cheese, guacamole and sour cream. Although incredibly delicious, I decided to elevate this dish by adding my little touch.
 
My version of Carne Asada Fries is very similar. I used seasoned fries versus plain – why not, it’s more flavor! 🥰 -, Cheddar Cheese sauce instead of cotija cheese and definitely Pico de Gallo. The other ingredients are the same… beef, guacamole, and sour cream.
 
First, I marinated the beef which can be anything from round roast, flank or skirt steak. I normally buy 🛒 it pre-sliced at my grocery store in Bellingham. It’s convenient. On the other hand, slicing it after it’s grilled is fine too.
 
In my marinade, I use chipotle in adobo… a great ingredient that gives some serious flavor. I don’t scoop it straight from the can 🥫 because it’s not evenly mixed – it can be sauce without pepper or a big pepper without sauce giving an unbalanced result.
 
To have a precise measurement with uniform flavor, I purée the smoked, dried, rehydrated jalapeño chiles 🌶 along with the tangy sauce. It takes just a few seconds to do it. I have an episode showing you how including what to do with the leftovers so here’s the link… How to make Chipotle Purée & Chipotle Mayo
 
In my marinade, I also add a big handful of cilantro which is roughly ½ cup, brown sugar, lime juice and seasonings. I also add freshly squeezed orange juice 🍊. I’m convinced nobody used it but let me tell you that it adds a nice flavor to it.
 
When the slices are nicely coated with the marinade – that’s why I prefer the meat sliced prior to barbecuing so each is covered with it -, I place them in a large re-sealable plastic bag and transfer them to the fridge for at least 6 hours ⏰ but longer is better.
 
When it’s time to grill, because the meat is so thin, oiling the grates prevents the slices from sticking. If you’re using a regular steak and slice it after it’s grilled 🔥, you don’t need to do this step. It takes only 1 to 1:30 minutes to cook the sliced meat per side… don’t overdo it as it will get tough.
 
After resting for a few minutes ⏳ covered with foil, they’re cut into bite sized pieces. The meat has to rest longer if it’s regular beef, before being sliced against the grain and then cut into small pieces. Typically, this dish requires only a fork… nothing else!
 
For the fries 🍟, you can make them from scratch – here’s the link French Fries -, or buy them frozen. As mentioned above, I prefer using seasoned fries as they add more flavor. Indeed, you can find them at the store. Soon, I’ll be sharing my Seasoned French Fries recipe so stay tuned.
 
When it comes to the cheese 🧀, I opt for my Cheddar Cheese Sauce in lieu of cotija cheese. Because it’s melted, it goes further. I use this sauce when I make my Chili Cheese FriesPierogi Casserole, or simply drizzled over steamed vegetables. It’s easy to make and a must have.
 
For the rest of the toppings, I use Pico de Gallo and guacamole 🥑. There’s already a recipe on guac which is David’s Creamy Guacamole. Mine is the one I use in this application and it’s Classic Guacamole. There’s a slight difference between these two but you can use either one.
 
Carne Asada Fries is the ultimate “summer” comfort food! This is a satisfying meal that everyone will truly enjoy. The toppings can be prepped ahead so there’s less to do when it’s time to grill the meat. It’s a recipe loaded with mouthwatering yumminess 😋!
Bon Appétit! 🍽
 
Check out these other great comfort food recipes… 😀
– Cajun Poutine
– Michigan Hot Dogs
– Sweet Chili Chicken Bites
– Sombrero Pizza
– Hawaiian Teriyaki Burgers
– Mac and Cheese
– New England Lobster Rolls
and for even more comfort food recipes 🥰, click on this link… Recipe Category • Comfort Food


For ingredient amounts, directions, and much more, visit  https://clubfoody.com/cf-recipes/carne-asada-fries/


Don’t forget to subscribe to our YouTube channel 📽 by clicking on this link… Club Foody YouTube
 

Carne Asada Fries


Thursday, May 23, 2024

Tuna Stuffed Lemons Recipe • Cute & Tasty! | Club Foody


David and I entertain a lot and each time, I like serving an appetizer… it sets the tone for the main course. I’ve already shared over a hundred 💯 recipes and I’m not done yet! Some are fancy while others are perfect for casual settings.
 
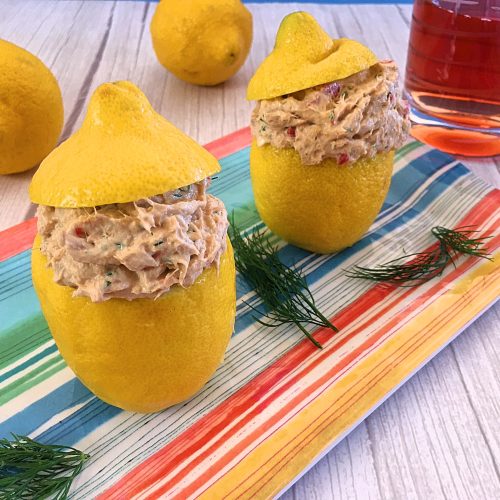
Here’s one that can be either formal or informal and it’s Tuna Stuffed Lemons! This featured recipe is beyond retro! It’s a vintage recipe from the 80s’! I made them when I was 20 years old which is about 25 years ago… okay maybe more, lol – let’s add another 15 to it 😏!
 
Back then, I was buying a weekly magazine with nothing else but recipes – unfortunately, I don’t recall the name of it 🤔… it’s been too long. I was also able to buy a folder to put the issues in. It kept them clean plus it was a nice addition to the bookshelves.
 
As a beginner in the cooking department, I made many recipes from the magazine and these Tuna Stuffed Lemons 🍋 was one of them. Over the years, I gave the folders away – if my memory is right, I had 3 of them but can’t tell you who I gave them to… it happens with age.
 
The reason why I decided to make this recipe is because I had a ton of lemons in the kitchen and I didn’t want to lose them. Trying to replicate the recipe, I had to focus. I even asked my mother 👵 but alas she couldn’t remember let alone the dish itself.
 
I knew tuna 🐟 and cream cheese were in it but that was the extent from memory land. Still, it was a good start… From there, I added different ingredients like mayo, Miracle Whip, roasted peppers, along with hot paprika and other seasonings – most likely few of them were from the original – ending up with this version! Tada!
 
I’m not a fan of pesticides therefore I always wash my produce 🍒🍆. Although we’re not eating the outside of the lemons, I still soak them in a natural “Fruit & Veggie Wash” … force of habit I presume. I pat them dry and proceed with the next step which is to prep them.
 
After thinly cutting the bottoms and top off each lemon, they have to be emptied. Using a sharp knife 🔪 to cut around the edges makes the task faster. From there, I like using my grapefruit spoon because it has a serrated edge plus a pointy tip making it easier to remove the flesh.
 
I discard the flesh and reserve the lemon juice for the filling. One time, I added some flesh to the mixture by accident. They were just little pieces and were fine but the texture was “funky”. If you want to use some of it, by all means, do it… I prefer not.
 
Now, let’s talk about a controversial ingredient… Miracle Whip. For those of you who lift your nose 👃 at this ingredient, adding some will bring the mixture together. Although similar in many ways, mayo and Miracle Whip are still different from one another…
 
Mayonnaise is rich and tangy while Miracle Whip has a blend of spices such as mustard, paprika, and garlic 🧄 plus it contains sugar. Miracle Whip has a lower fat content versus its counterpart making it a “healthier version”. Feel free to alter the recipe by using all mayo but you’ll be missing out on flavor!
 
This is a quick ⏳ and easy appetizer to make plus it makes a great presentation. Absolutely adorable to look at, these Tuna Stuffed Lemons are perfect when entertaining. Without being pretentious, they’re ideal for both formal and casual settings.
Bon Appétit! 🍽
 
Here are more incredible appetizer recipes for you to try… 😀
– Croquetas de Jamón • Ham Croquettes
– Oven Baked Jalapeño Poppers
– Gougères aka Cheese Puffs
– Crab Stuffed Mushrooms
– Beet Hummus
– Prosciutto e Melone
– Shrimp Sliders
and for even more appetizer recipes 🍣, click on this link… Recipe Category • Appetizers


For ingredient amounts, directions, and much more, visit  https://clubfoody.com/cf-recipes/tuna-stuffed-lemons/


Don’t forget to subscribe to our YouTube channel 📽 by clicking on this link… Club Foody YouTube
 

Tuna Stuffed Lemons


Tuesday, May 21, 2024

Kansas City Style Pork Ribs Recipe • Tender & Tasty! | Club Foody


If I would be asked to name my 3 favorite barbecue recipes, I’m not sure I would be able to 🤔. There’s Rotisserie Chicken that I really love but there’s also Peri Peri Chicken. A nice juicy burger is so yummy but so is a beautiful T-bone steak! The same applies with a lovely Blackened Grilled FishTuna Steaks, etc.
 
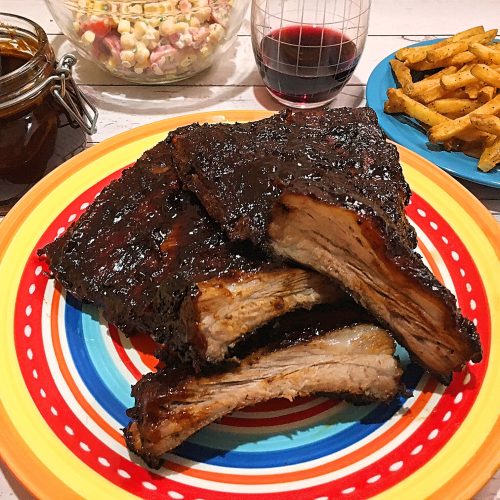
Despite my inability 😏 to answer that simple question, there’s another one that David and I really like to grill and it’s ribs. It can be my Canadian Smoky Pork RibsAsian-Style Beef Short RibsBBQ Pork Ribs or this one… my Kansas City Style Pork Ribs!
 
This recipe is pretty straightforward. After prepping and portioning the ribs, a dry rub is applied all over the meat including the sides, then they’re wrapped tightly in foil and chilled. Later on, they’re grilled in the foil for hours before finishing them directly on the grill 🔥, brushed generously with BBQ sauce.
 
This recipe requires just 3 ingredients!
My Kansas City Dry Rub, my Kansas City BBQ Sauce and of course, the ribs!
 
I like making my own rubs from scratch. There’s my Fish Rub 🐟, Smoky BBQ Rub, Coffee Cocoa Rub and this one… Kansas City Dry Rub. Freshly made, they’re all stored in airtight containers, in a cool, dark area and keep very well for 4 to 6 months.
 
Another component of these Kansas City Style Pork Ribs is the sauce. Like any respectful grilled food, they need a tasty one. My Kansas City BBQ Sauce is among them! I have other ones as well (of course I do! 😉) like TeriyakiCaribbean BBQ SauceSpicy Strawberry Orange Sauce, and others.
 
When it comes to the ribs, there’s an important step to follow each time and it’s to remove the membrane on the back of the ribs. Also called “silver skin”, the membrane doesn’t soften when cooked and the result is it will become tough and chewy. It doesn’t break down so pull it off before grilling.
 
These Kansas City Style Pork Ribs are amazing 😋! Tender and juicy, these are definitely a must try! With a tasty combination of both Kansas City Dry Rub and Kansas City BBQ Sauce, they’re sure to become a hit this summer!
Bon Appétit! 🍽
 
Check out these other great BBQ & grilling recipes… 😀
– Huli-huli Chicken
– Tomates à la Provençale (Tomatoes Provencal)
– Mushroom Swiss Burgers
– Pacific Coast Salmon on the BBQ
– Greek Ouzo Pork Kebabs
– Fire Roasted Salsa
– Shrimp Sliders
and for even more barbecue recipes 🔥, click on this link… Recipe Category • BBQ & Grilling


For ingredient amounts, directions, and much more, visit  https://clubfoody.com/cf-recipes/kansas-city-style-pork-ribs/


Don’t forget to subscribe to our YouTube channel 📽 by clicking on this link… Club Foody YouTube
 

Kansas City Style Pork Ribs


Thursday, May 16, 2024

Classic French Carrot Salad Recipe • Fresh & Tasty! | Club Foody


I know I keep repeating myself but I really love salads 🥗! I find them versatile. Some can be a great meal while others are delicious sides. With fresh produce, the majority of them are healthy. They’re also ideal for potlucks and picnics.
 
As a meal, I think of Julienne SaladBuffalo Chicken SaladGrilled Shrimp Summer SaladPittsburgh Steak SaladCobbWinter Citrus Salad, etc. When it comes to sides, there’s Caesar SaladTabboulehCucumber SaladSpring Pea Salad, and the list goes on 📜.
 
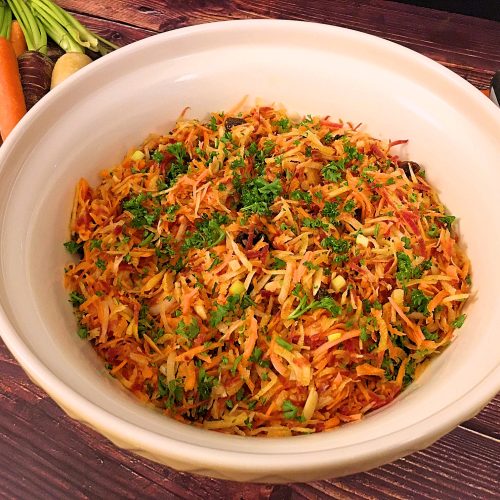
Another side that I’ve been eating since childhood is the Classic French Carrot Salad! It’s such an easy recipe plus it’s perfect for pairing with many proteins 🐂🐓🐟. Served with a lovely Dijon mustard vinaigrette, this side is packed with gorgeous flavor!
 
I remember my mother and aunts serving this salad as a side. It was probably the most loved one among us kids. The sweetness from the carrots 🥕 and the raisins, and the crunch from the nuts was enough to make it any of my cousins favorite!
 
Since then, I modified the recipe… of course, what else is new 😏! Instead of using chopped walnuts, I switched for toasted slivered almonds. I added chopped green onions and parsley. If I can find colored carrots, they are my first choice over the regular ones- it’s esthetically better looking.
 
When it comes to the vinaigrette in this Classic French Carrot Salad, I did the same. Mom and aunts were using vegetable oil… I use a mix of grapeseed and extra virgin olive oil. Instead of just lemon juice, I pour in orange juice 🍊. It adds that gorgeous citrus note in the background.
 
There was always Dijon mustard and honey 🍯 from our family recipe. The extra ingredient I like adding is hot paprika. Just a couple pinches of it brings on a little heat to the vinaigrette. You can use cayenne instead but I prefer paprika.
 
From start to finish, it takes maybe 10 minutes ⏰. I like using the food processor with the shredding disc which takes less than a minute to shred 1 pound of carrots… awesome! After the carrots are done giving you about 4 cups, the rest goes pretty fast; make the vinaigrette, mix everything and voilà!
 
As much as PastaGreek and Potato Salads are a summer favorite, you might want to try this Classic French Carrot Salad! This healthy salad 💚 is a tasty one to make this season plus it’s ideal for picnics and potlucks!
Bon Appétit! 🍽
 
Check out these other tasty salad recipes… 😀
– Salade Niçoise
– Israeli Salad
– Egyptian Farro Salad
– Glass Noodle Salad
– Moroccan Potato Salad
– Quinoa Beet Salad
– Salade Lyonnaise ~ Lyonnaise Salad
and for even more salad recipes 🥗, click on this link… Recipe Category • Salads & Dressings


For ingredient amounts, directions, and much more, visit  https://clubfoody.com/cf-recipes/classic-french-carrot-salad/


Don’t forget to subscribe to our YouTube channel 📽 by clicking on this link… Club Foody YouTube
 

Classic French Carrot Salad