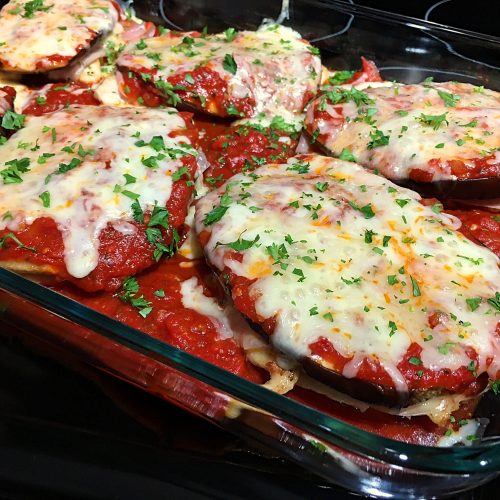
At home, we eat all kinds of proteins but for some reason, it seems like chicken is the one we have most often. There are so many ways to prepare it and also millions of recipes out there. According to the United Nations Food and Agriculture Organization, chicken is the second most consumed meat in the world after pork… interesting, I taught it would be first. Myself, I probably have over 200 recipes using this protein if it’s not more. I love diversity and have many to choose from all around the world. There’s my famous Chicken Cordon Bleu, Peri Peri Chicken, Chicken Nuggets, Shawarma Chicken Kebabs, Cashew Chicken, Hunter’s Chicken, Chicken Paprikash… just to name a few. When it comes to Italian inspired recipes, the list is long as well… Chicken Valdostano, Slow Cooker Chicken Cacciatore, Chicken Scarpariello, Chicken Parmesan, Chicken Milanese, Chicken Vesuvio, Chicken Saltimbocca, and many more including this delicious one… Chicken Sorrentino! This dish is simply incredible with layers of flavor! Using chicken cutlets or chicken breasts that have been pounded down followed by prosciutto, slices of eggplant, marinara sauce and topped with Fontina cheese, this is a meal that David and I really enjoy! Making Chicken Sorrentino is like dancing a Waltz. After the mise en place is done, every step has to be synchronized so when the eggplant slices are in the oven for 20 minutes, the dredged chicken is cooked in the skillet for 3 minutes per side. Then comes the sauce which takes less than 8 minutes to make. The eggplant comes out of the oven and it’s time to assemble before transferring it to the oven for 10 minutes. If you time yourself right, you should have this dish ready to serve in less than 35 minutes. Chicken Sorrentino also knows as Pollo alla Sorrentina is perfect for weeknights but it’s also elegant enough to serve at your next dinner party. It’s a tasty comfort food that should definitely have a special spot in your folder… Bon Appétit! Check out these other incredible chicken recipes… – Chicken à la Dijonnaise – Chicken Tikka Masala – Mandarin Chicken – Crispy Oven Baked Chicken – Chicken Tortilla Soup – Coq au Vin – Szechuan Ginger Chicken and for even more chicken recipes, click on this link… Recipe Category • Chicken
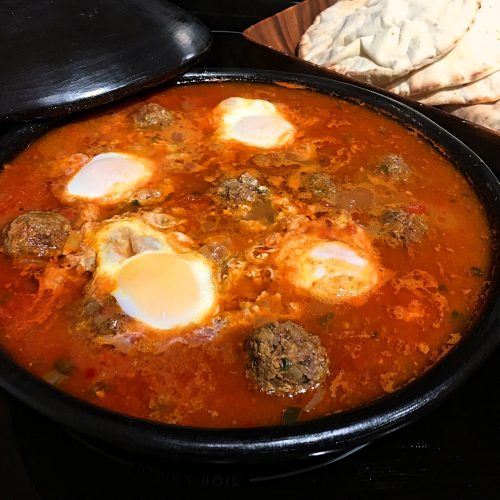
If someone asked me what my top 3 favorite cuisines worldwide were, after hesitating and looking like a deer in the headlights, I would raise my shoulders, shake my head a bit and say ” I don’t know!” and that’s the truth! From all the different cultures on this planet with their ingredients, seasonings and delicious dishes, how can I narrow it down to just a few? My bucket list is as long as two football fields and it’s mostly visiting foreign countries and trying their foods. One of them is Morocco. I told David many times that the day we go there, he better be prepared to shop, explore and taste. My shopping list has been made for a long time; carpet, tea set, some gorgeous ceramic bowls and spices (I’m sure you guessed that one). The places to visit is quite long so I won’t go there but when it comes to dishes, I can’t wait to sample Zaalouk, Harira, Makouda, Mechoui, B’ssara, Chebakia or a nice lemon cake called Meskouta, and many others. I’ve already shared some recipes from this exotic part of the world like Couscous, Baba Ghanoush, Merguez, plus a few inspired by this region; Moroccan Potato Salad, African Lamb Tajine, North African Chicken Thighs with Dates and Pomegranate Molasses. There’s a popular one from that country I really enjoy and it’s Moroccan Kefta Tajine! OMG! With little cocktail-sized meatballs made with beef and lamb cooked in a zesty tomato sauce, this is an incredible dish to make! It’s often served with eggs poached right on top of the sauce… similar to that delicious breakfast called Shakshouka! Using Knobz or Baguette to scoop up the sauce and meatballs straight from the tajine, this is a delicious recipe that will bring you straight to this North African country. The “traditional” way of making the tomato sauce is more involved than mine. After cutting and seeding the fruit, the tomatoes are grated before discarding the skin. I find it too time consuming plus I don’t mind the seeds and skin in the sauce. Another good way to get rid of the skin is by simply blanching the tomatoes before. My Moroccan Kefta Tajine tomato sauce version is very simple… I simply crush some San Marzano tomatoes by hand, that’s all. A different approach would be using Passata instead. As the name implies, the famous clay or ceramic cooking vessel used for this recipe is a tajine – did I mention I’ll be buying one (or 2) when we go visit? If you don’t own one, a deep skillet or a Dutch oven will do just fine. If using the earthenware pot with its dome-shaped lid, just make sure to place a diffuser underneath between the heat source and the pot. This savory dish is simple and yet so tasty! I love making Moroccan Kefta Tajine during the cold months… a great earthy dish for the soul! When you try this fabulous comfort food this winter, don’t be surprised if you start planning your trip to Africa as well… Bon Appétit! Here are more great comfort food recipes for you to try this winter… – Pumpkin Chili – Southwest Beef Casserole – Eggplant Rollatini – Hunter’s Chicken (Poulet Chasseur) – Veal Florentine – Coffee Beef Stew – Fisherman’s Pie and for even more lamb recipes, click on this link… Recipe Category • Lamb
David and I live pretty far away from our families; his are mostly in Alberta while mine are in Québec. We also have a few friends who live in other provinces. Trixie and Georgie are in Newfoundland while Joanne & Victor are just outside of Toronto. There’s also Michelle & Murray in Saskatchewan and our Manitoban friends Paul & Peggy. In the states, the list is as long as many are spread out in the state of California including another sweet couple who live in Florida. When Thanksgiving, Christmas, Easter and other holidays and events occur, these out of town loved ones might come and stay overnight or for a few days. Breakfast is a meal you have to make for them. As much as bacon, eggs & toast are always welcome, it’s nice to serve something different like Angel Eggs on a Cloud, Coconut Waffles, Soft Boiled Eggs, White Omelet, Avocado Sweet Pea Toast, Shakshouka, Apple Cheese Soufflés, and so on. Another alternative is to make a Frittata, a Breakfast Casserole or this featured one… Mini Mexican Tortilla Quiche! This is so flavorful and certainly a great way to start your day! It doesn’t take too much time to prep and cook plus the presentation is so elegant… perfect for special occasions or when your family and friends are staying overnight. In the past, I shared my classic Quiche Lorraine which is always a hit. This Mini Mexican Tortilla Quiche version is also a winner. After combining fresh ingredients with eggs and seasonings, the mixture is poured into tortillas sitting in a jumbo muffin pan and cooked in the oven until set. There’s not a lot to do when you think about it giving you more time to spend with your guests. Either for brunch or when there are out of town visitors, you have to serve this! With a nice side of salad, this elegant and delicious individual Mini Mexican Tortilla Quiche is a great dish plus it’s so cute… it looks like a flower blossom with yumminess inside! Bon Appétit! Here are more scrumptious breakfast recipes for you to try… – Breakfast Quinoa Cereal with Mixed Berries – Eggs Benny Poutine – Healthy Homemade Granola – Breakfast Burritos – Pineapple Banana Bread with Coconut & Macadamia – Creamy French Eggs – Southwest Gravy and for even more breakfast recipes, click on this link… Recipe Category • Breakfast & Brunch
When we have family and friends over, I can’t imagine not serving at least a 3 course menu – it’s a full experience. I need an appetizer, obviously a main course and a dessert… the final delicious touch to a meal! It doesn’t matter how perfect the appetizer and main course were, they will certainly remember the dessert so it has to be good.
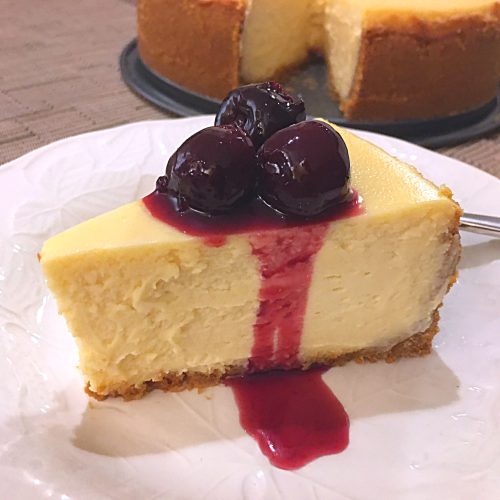
Another one I like to bake is my Creamy Cheesecake! My version is more towards the Chicago-style although I use the New York-style for my crust. It’s tall, light, moist, and creamy with a smooth texture! Rich with great flavor, this fool-proof dessert is perfect to serve throughout the year for any occasion…
There’s some time involved. It’s best to start the day before serving it… First the crust has to be made by combining graham cracker crumbs, sugar, salt, melted butter and vanilla extract until the mixture resembles damp sand. After pouring it into a 9-inch non-stick springform pan, move the mixture towards the edges and as high as possible, pressing down firmly – don’t worry about the bottom, it’s an easy fix. To facilitate the task, use a flat bottom glass or a measuring cup. After it’s done, bake for 7 minutes or until the edges just start getting golden.
After the buttery graham cracker crust is made and quickly baked in the oven, the next step is the filling. To incorporate it easier, all the ingredients have to be at room temperature which will prevent the texture from getting lumpy as well as overmixing. With the paddle attachment on medium speed, the cheese is creamed until smooth before incorporating sugar, salt, full fat sour cream and vanilla extract.
When making cakes, always use full fat sour cream – don’t go light… it’s not the dessert to be on a diet! Sour cream gives better results than using milk. The reason is because the higher fat content and acidity ends up making a moister and richer cake. It also gives a nice tangy flavor… yum!
The most important thing in this whole process is to stop the appliance frequently and clean the sides of the bowl especially scraping the bottom where small lumps can be hiding – we want the texture of our Creamy Cheesecake as flawless as it can be!
While the appliance is running, add one egg at a time mixing well between each addition – don’t forget to clean the sides and scrape down the bottom of the bowl for a smooth lump-free texture. Another “tip” about making this cake is to “NOT RUSH” anything… take your time, that’s all I have to say!
When the filling is done, pour it into the prepared cooled crust and gently tap it on the counter to dislodge any trapped bubbles. Place it on a baking sheet – it’s easier to handle – and bake for 10 minutes at 350ºF then reduce to 300ºF and continue baking for another 50 to 60 minutes or until the edges are puffed. Turn off the temperature and leave the cake, undisturbed, in the oven with the door closed for 1 hour.
After the cooling time is done, remove from the oven and let it cool at room temperature for another hour. During the coldest month of the year, my kitchen is far from being warm so to no shock the cake after it has cooled for one hour in the oven, I open the door slightly ajar and let it sit for another 30 minutes before transferring to the counter at room temperature for another 60 minutes.
Here are a few tips to make the perfect flawless Creamy Cheesecake… • Bring all your ingredients to room temperature • Don’t overmix otherwise too much air gets into the batter leading to the cake over rising and cracking as it deflates – stop mixing when just incorporated • Clean the sides of the bowl as well as scraping down the bottom for a lump-free texture • Don’t rush it • After pouring in the prepared crust, gently tap the cheesecake on the counter to dislodge any trapped air bubbles • Don’t open the door to peek because the cold air will enter the oven while the hot air escapes causing the cake to fall and/or crack • After the baking time is done, turn off the heat and leave the cake in the oven for an hour to let it cool gradually. • During the cold months, after it has been sitting in the oven to cool off, open the door ajar and give it another 30 minutes to adjust • Allow the cake to cool completely at room temperature before transferring to the refrigerator • In case there are some slight imperfections on the surface, simply spoon some toppings on to cover it… you’re allowed and the cake police won’t punish you for doing that!
This scrumptious Creamy Cheesecake will last 4 days when covered with plastic wrap or a lid and refrigerated. Wrap in multiple layers of cling film then foil and freeze the entire cake or leftovers (how can that be possible!) for up to 2 months. Thaw the cake or leftovers overnight in the fridge.
With no water bath involved, this fool-proof Creamy Cheesecake is the best there is! With all the tips I give on the blog/video, the cake will come out perfect every time without any cracks forming on top. This crowd pleaser has to be on your menu next time you’re entertaining… trust me, everyone will rave about it! Bon Appétit!
Vacations are a healthy way to recharge your batteries. Unless you’re in a very comfortable financial position, most people work all year round and only have a few weeks to relax. It’s certainly not enough and that is why everyone looks for other ways to take mental and physical breaks before their next vacation. David and I have been pretty lucky as we’ve been able to take two to four months off a year. We’re not retired yet but we’re working towards it. When we’re not vacationing, we like to play golf, read and also watch movies… it’s a nice way to be entertained and also take our mind off work. We try to dedicate at least one movie night a week – it’s not always obvious with me filming many of our dinners. Nonetheless when we do, I like to have something to snack on like my onion dip along with my lightly salted chips, my party mix, homemade salsa, beer cheese dip, spiced nuts, nachos, spinach artichoke dip, and many more including this one… Homemade Cracker Jack! If you gave me a case of the commercial ones, I wouldn’t take them! When I started making my own, I never went back! My Homemade Cracker Jack version is so much better because I’m in the control seat for how much peanuts to add to it, how sweet I want the mixture to be as well as the amount of sodium in it – the only thing missing is the toy inside. Last time I had “the box” was back in the 90s’ and I was so disappointed… barely any peanuts and the taste wasn’t nearly as intense as before. It doesn’t take that much time to make to get delicious results. Like I always say – “recipes are guidelines therefore adjust them to your liking”. That being said, I’m not too keen on a high volume of molasses and prefer more sweetness to mine. We also love peanuts so in my recipe, I’m quite generous with the amount. For the popcorn, I simply use my hot air machine – I don’t care about the microwaved ones as I find there’s a “funny” taste in the background. Again, pop your kernels the way you prefer… Homemade Cracker Jack is one way to enjoy popcorn but I have other flavors as well like Cheddar Cheese, Ferrero Rocher, Buffalo Ranch and Pink – the last one is perfect when I want to watch some “chick flick” movies! As you see, there are other ways to enjoy these fluffy little guys! When we’re not vacationing somewhere, we definitely need our minds to escape reality and “movie night” does it! With a big bucket of Homemade Cracker Jack, a comfy blanket and a tall glass of water, we sit in our dark living room watching the big screen and let our brains wander until we go on our next trip… Bon Appétit! Check out these other delicious snack recipes… – Spicy Holiday Chocolate Bark – Sesame Snaps – Sucre à la Crème – Butter & Cream Fudge – Jalapeño Bacon Cheese Dip – Bounty Chocolate Bites – Homemade Pretzels – Paçoca – Chocolate Mint Nanaimo Bars and for even more snack recipes, click on this link… Recipe Category • Snacks
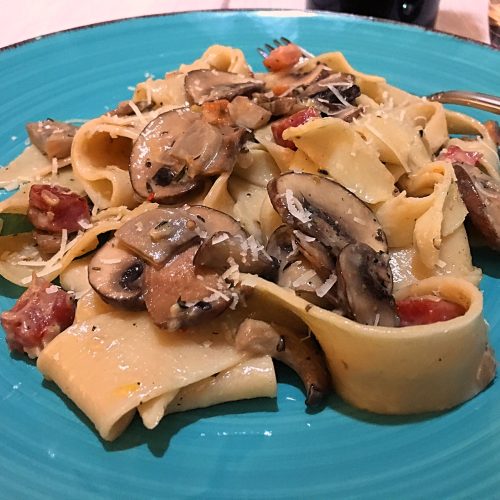
Yep, one of my favorite topics… time! Everyone seems to have crazy schedules and not enough time to do everything let alone cook. With Thanksgiving and the Holidays approaching, time is lessened and sadly many will opt for process foods, take-out, or frozen dinners. My question is “why”? I have so many quick and easy recipes that keep coming almost every month, I’m sure there are at least half a dozen you can choose from and make for your family. Don’t worry, I’m in the same boat as you and when I don’t have enough time, here are a few of many I rely on; Hamburger Helper, Orzo with Chicken & Asiago, Cauliflower Fried Rice, Panko Breaded Fish Fillet, Bacon Wedge Salad, Japanese Chicken Soba Noodles, and others including this featured Pappardelle with Pancetta & Mushrooms! Pasta is probably my first option when time is in short supply. Most pasta dishes take no time at all like Spaghetti alla Carbonara, Zucchini Pork Penne, Gnudi, Smoked Salmon Fettuccine Alfredo, Penne alla Vodka, and the list goes on. Pappardelle with Pancetta & Mushrooms is among our favorites. It takes no more than 10 minutes to prep and 20 minutes at the most to cook… While the noodles are boiling, pancetta, shallots and mushrooms are sautéed before adding Italian seasoning, lemon zest, black pepper & red pepper flakes with a touch of white wine and heavy cream… of course, let’s not forget the cheese! As soon as the pasta is cooked, dinner is ready! We all try to find short-cuts in our daily routines and that includes meals. Making this delicious Pappardelle with Pancetta & Mushrooms is fast and so tasty, it will surely become a family favorite and yours as well when you’re running out of time… Bon Appétit! Check out these other quick recipes… – Creole Couscous with Andouille & Shrimp – Chicken Nuggets – Fish in Coconut Milk – Croque-madame – Steak Oscar – Filet-O-Fish Sandwich – Mediterranean Chicken Pesto Pasta – Moules Marinière and for even more quick and easy recipes, click on this link… Recipe Category • Quick & Easy
Hosting Thanksgiving, Christmas, Easter and other holidays and events can be stressful and time consuming. If you’re a perfectionist like me, everything has to be impeccable! After deciding on the menu and pairing wine with your meal, shopping and cleaning are the next steps. The house has to be “spic and span” and that includes the silverware. Like most people, I don’t use my silverware a lot and only take it out for special occasions. After sitting for a while, it gradually darkens and becomes dull. As you know, it takes an enormous amount of time to clean and shine it but what if I told you that you can Remove Tarnish on Silverware in 10 minutes? I’m not kidding you! Not only does this homemade cleaning method work but it’s almost effortless or next to it! Here’s how you do it… To Remove Tarnish on Silverware in 10 minutes, line the bottom and the sides of a bowl with aluminum foil before pouring in boiling water… not tap water! Add some baking soda or laundry detergent to the bowl then place your silver and silverware in it. To make sure it works, the silver has to touch the foil and be completely submerged in water. The ratio is a tablespoon of baking soda or laundry detergent per cup of boiling water. Now watch and let the magic begin! Well not really, there’s a logical explanation behind it. I’m not a scientist but I married one and here’s what happens. The reaction that occurs when aluminum foil, water and baking soda are combined is known as an “ion exchange”. As the tarnish lifts off of the silver which is known as “silver sulfide”, it reverses into “aluminum sulfide”. To make this electric reaction occur, the silver and aluminum have to be in contact with each other. I’m sure you remember from your chemistry class what this reaction is called… yep, that’s right… electrochemical – I should’ve paid more attention back then, lol! This Remove Tarnish from Silverware in 10 Minutes method works in most cases almost immediately. If the silver is extremely tarnished, you may have to repeat the water bath treatment again. I love this homemade cleaning method because it’s fast, doesn’t tie up my “precious” time plus there are no harsh chemicals used. Don’t get stressed before your guests show up and save some time and money by cleaning your silverware using this method… Bon Appétit! Here are a few tips and tricks that can be quite helpful… – How to Set a Table; Casual to Formal – Seed a Pomegranate without the Mess – Beurre Manié – Vanilla Sugar – How to Make It – Defrosting Meats Quickly – Pearl Onions • Easiest Way to Peel – How to Store Celery for Weeks and for more handy kitchen tips and tricks, click on this link… Recipe Category • Tips & Tricks Don’t forget to subscribe to our YouTube channel by clicking on this link… Club Foody YouTube

 Posts
Posts